WordPress: adding a sidebar media panel

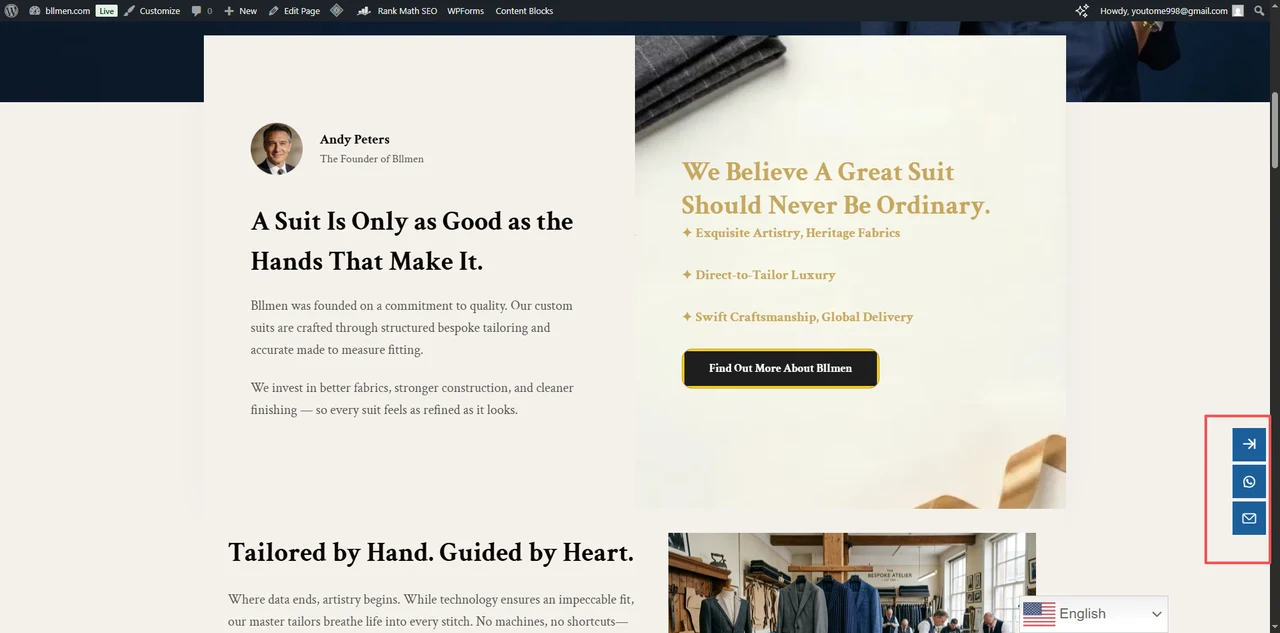
It is actually very simple — just make a global floating block
The code is at the bottom
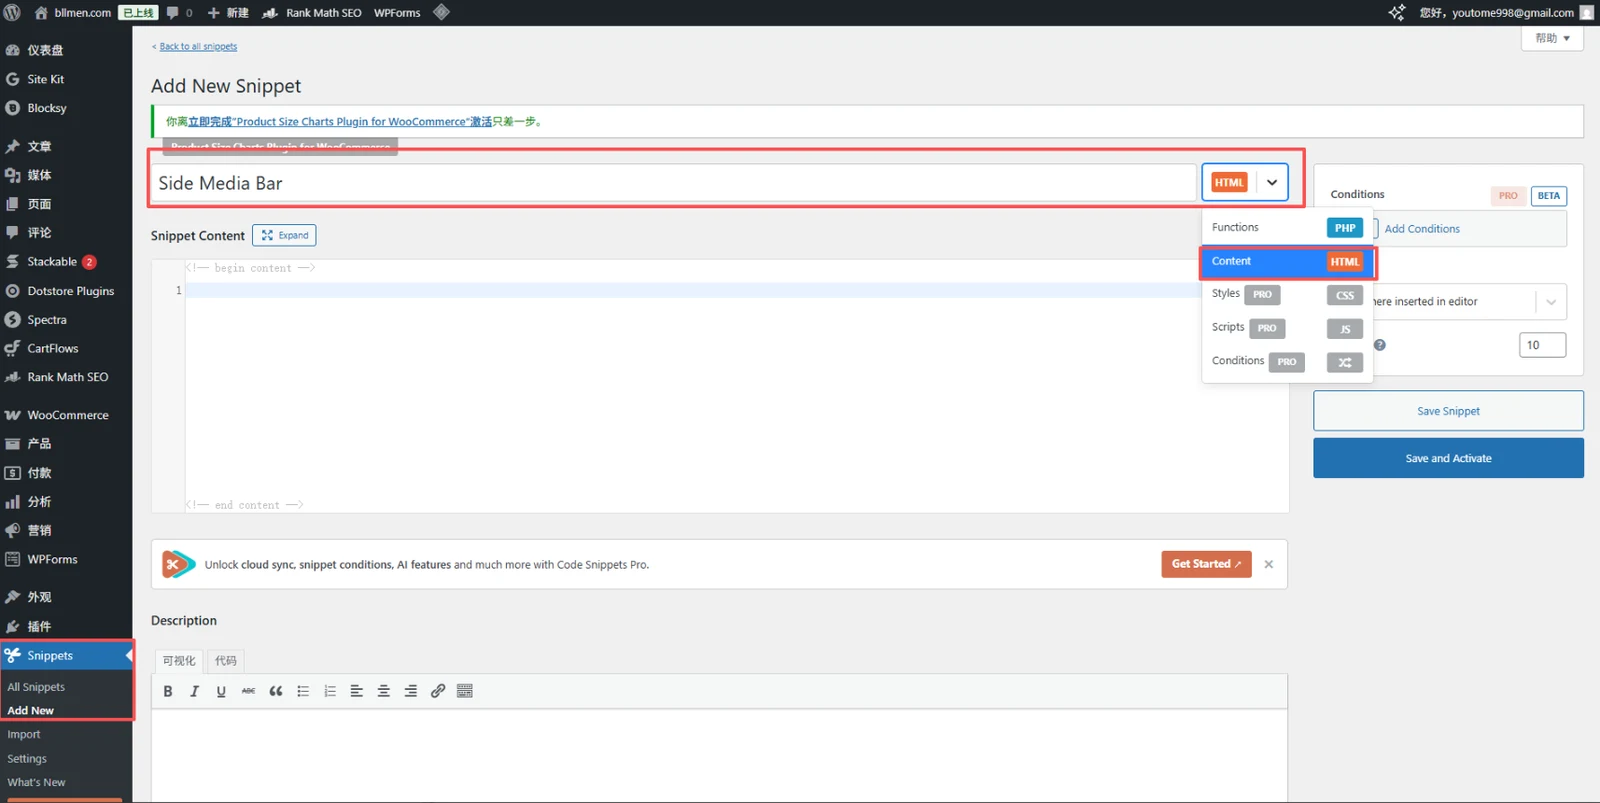
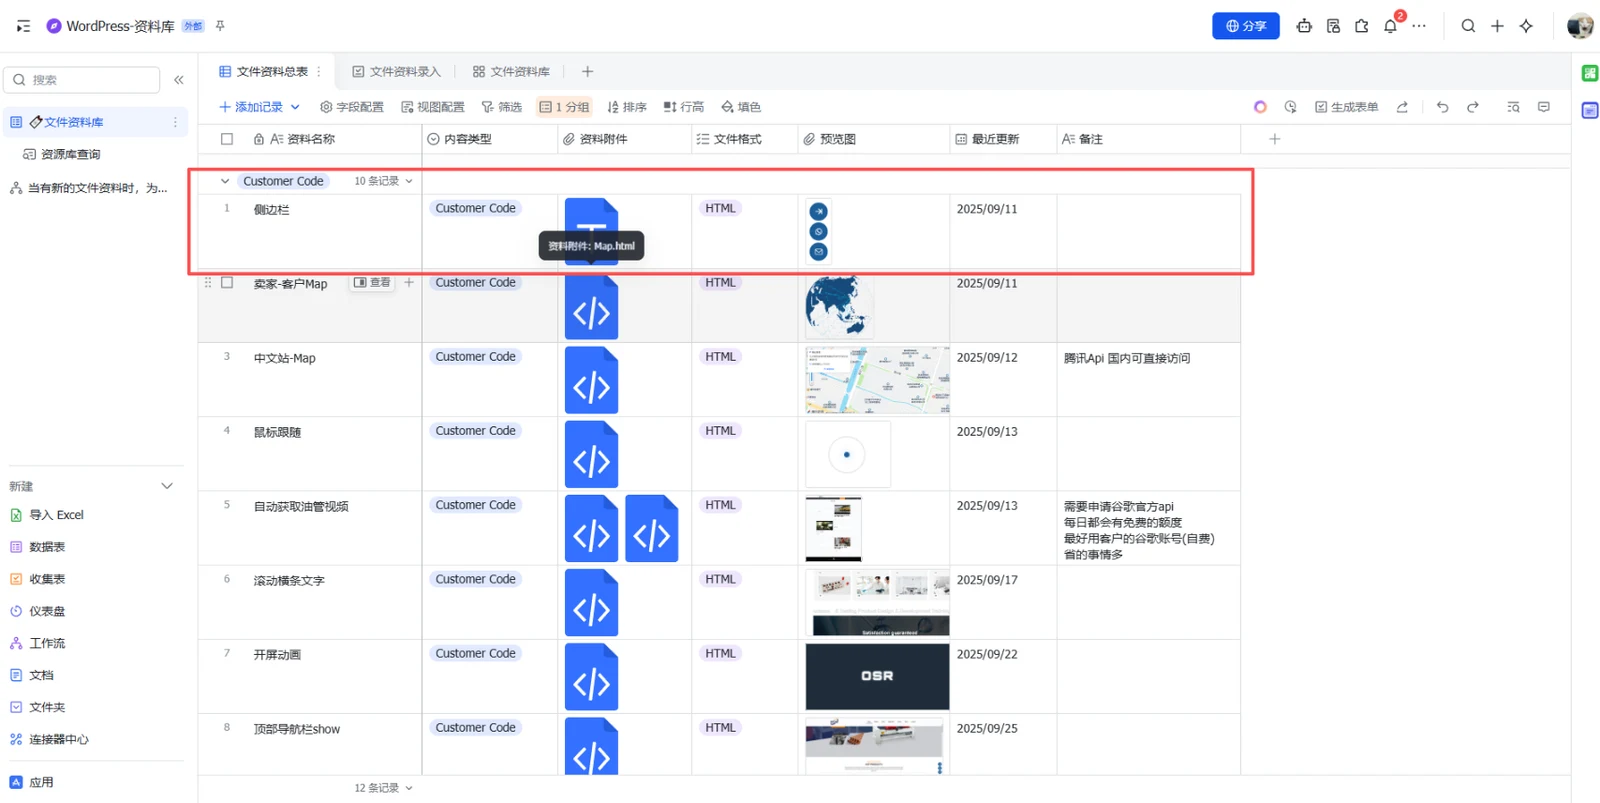
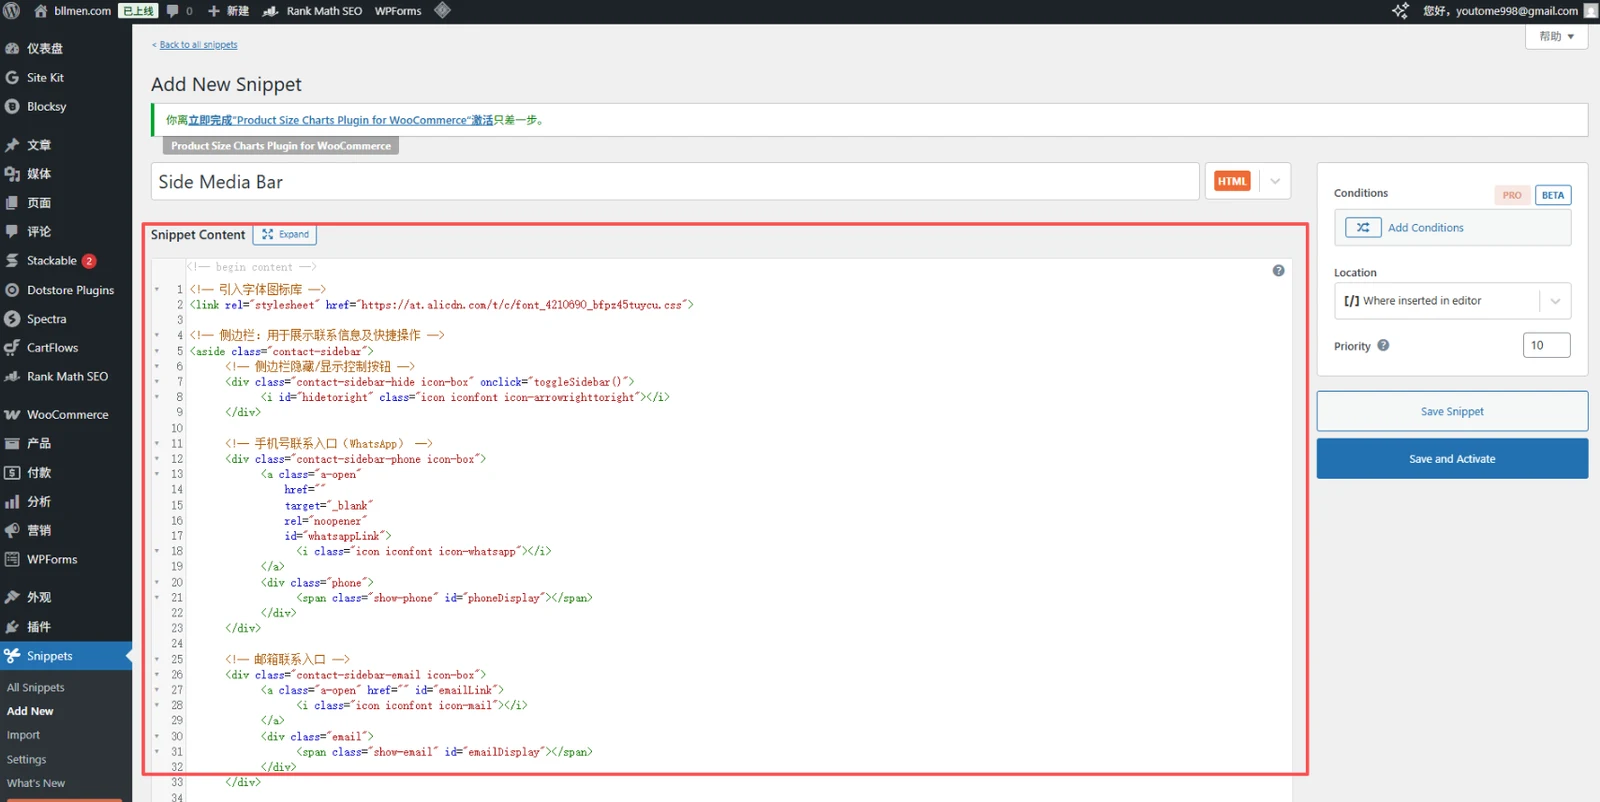
1

2

3

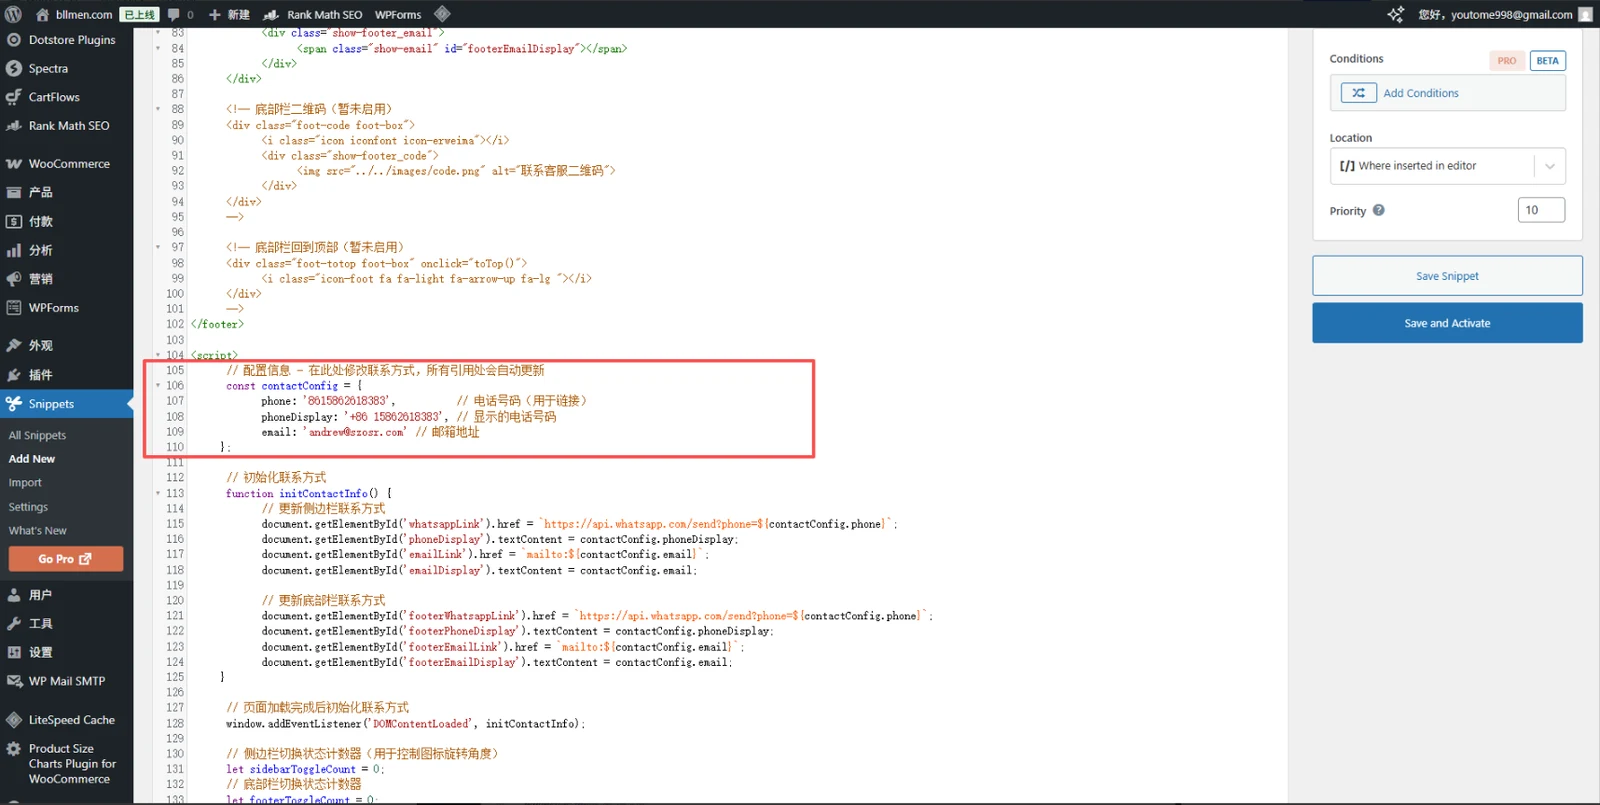
Change the content on lines 105-110 to the client's contact details
4
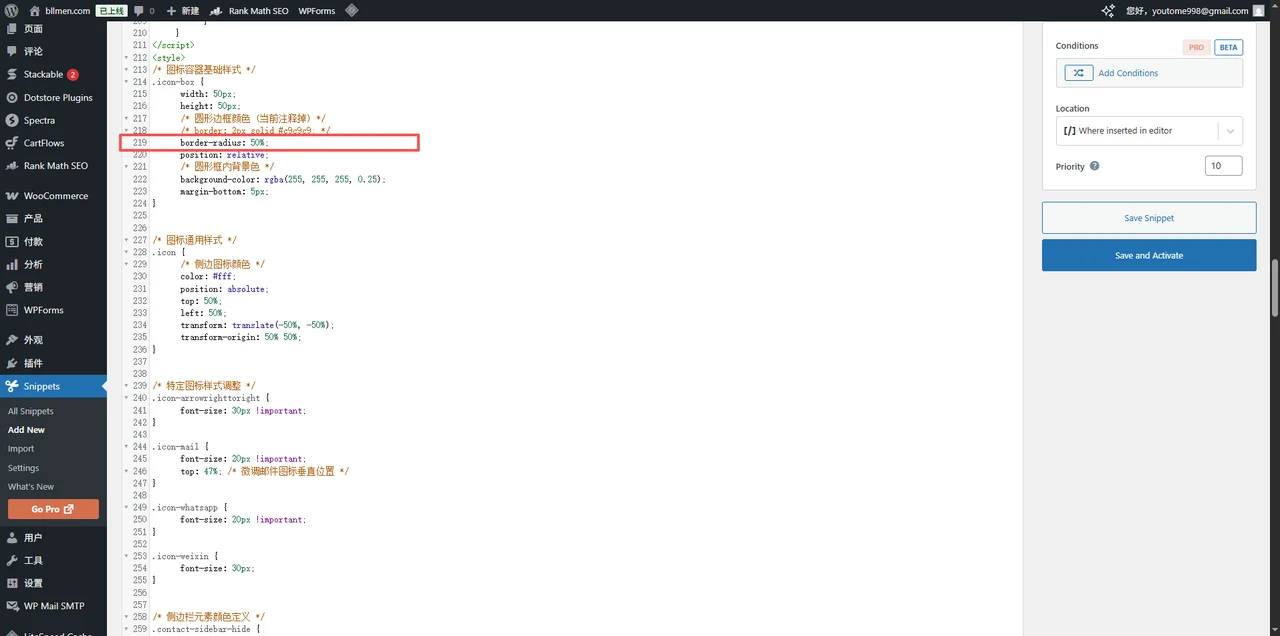
On line 219, change the icon shape: 50% for a circle, 0% for a square, 8%-16% for rounded corners
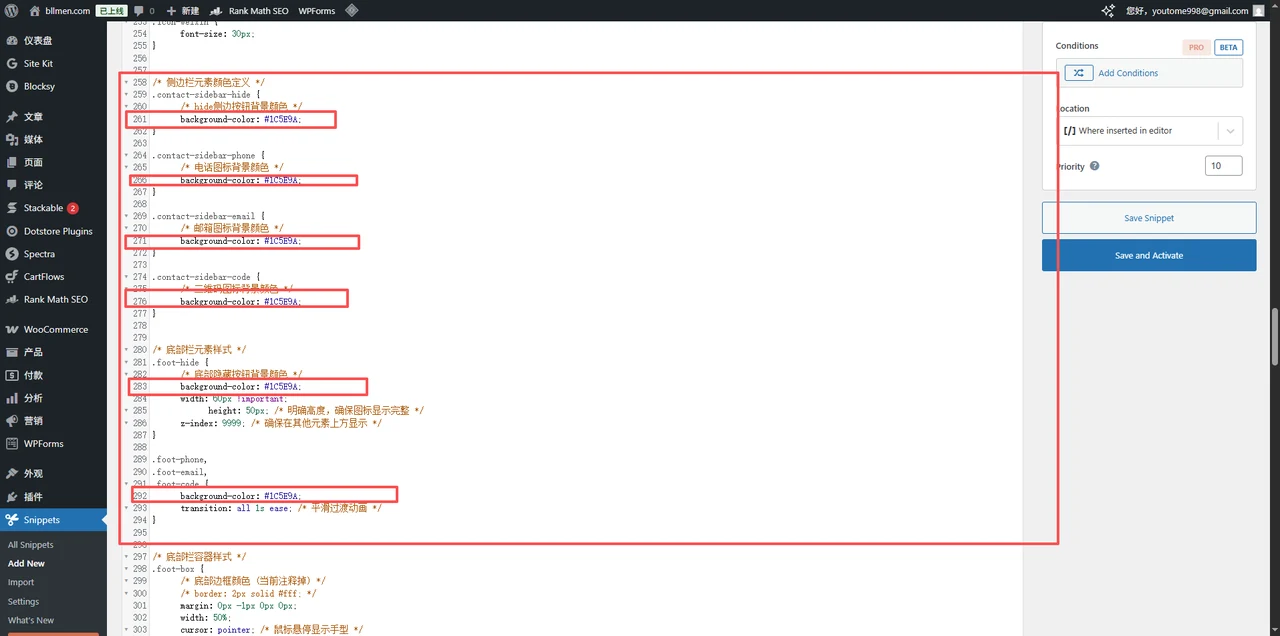
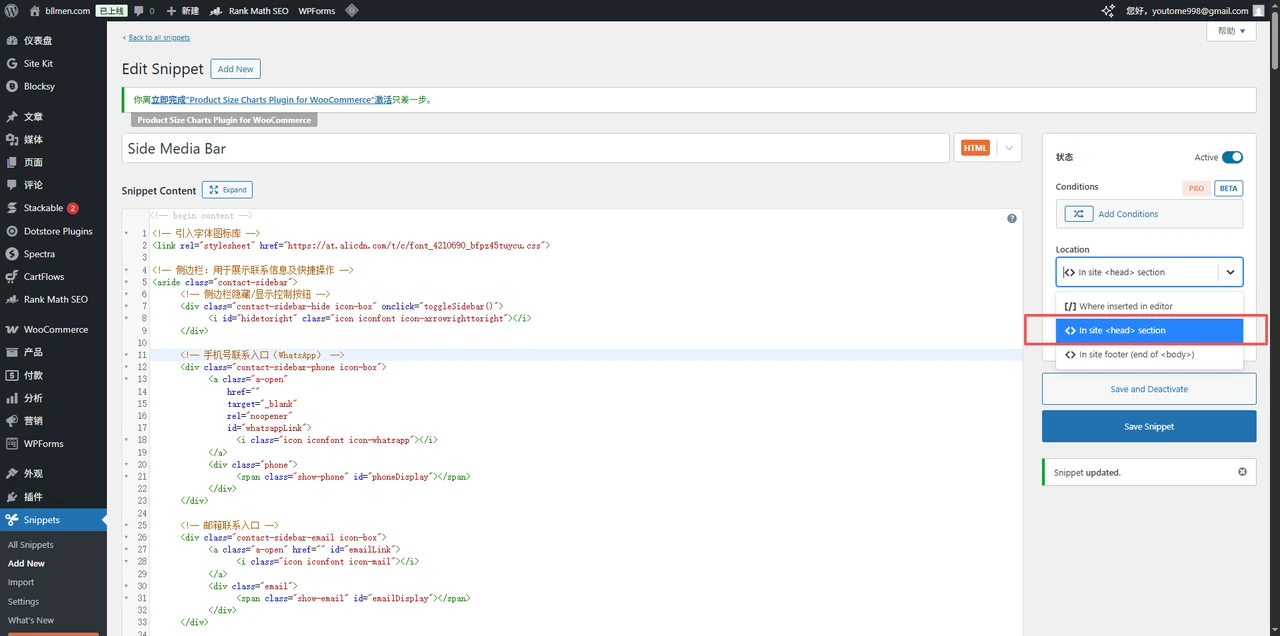
5

6

7

8


<!-- Import the icon font library -->
<link rel="stylesheet" href="https://at.alicdn.com/t/c/font_4210690_bfpz45tuycu.css">

<!-- Sidebar: contact details and quick actions -->
<aside class="contact-sidebar">
    <!-- Sidebar hide/show toggle button -->
    <div class="contact-sidebar-hide icon-box" onclick="toggleSidebar()">
        <i id="hidetoright" class="icon iconfont icon-arrowrighttoright"></i>
    </div>

    <!-- Phone contact entry (WhatsApp) -->
    <div class="contact-sidebar-phone icon-box">
        <a class="a-open" 
           href="" 
           target="_blank" 
           rel="noopener"
           id="whatsappLink">
             <i class="icon iconfont icon-whatsapp"></i>
        </a>
        <div class="phone">
            <span class="show-phone" id="phoneDisplay"></span>
        </div>
    </div>

    <!-- Email contact entry -->
    <div class="contact-sidebar-email icon-box">
        <a class="a-open" href="" id="emailLink">
             <i class="icon iconfont icon-mail"></i>
        </a>
        <div class="email">
            <span class="show-email" id="emailDisplay"></span>
        </div>
    </div>

    <!-- QR code display (not enabled yet)
    <div class="contact-sidebar-code icon-box">
        <a class="a-open" href="#" target="_blank" rel="noopener">
            <i class="icon iconfont icon-weixin"></i>
        </a>
        <div class="code">
            <img class="show-code" src="../../images/code.png" alt="WeChat QR code">
        </div>
    </div>
    -->

    <!-- Back-to-top button (not enabled yet)
    <div class="contact-sidebar-totop icon-box" onclick="toTop()">
        <i class="icon fa fa-light fa-arrow-up fa-lg"></i>
    </div>
    -->
</aside>

<!-- Bottom bar: contact details on mobile -->
<footer class="footerbar" id="footerbar">
    <!-- Bottom bar hide/show toggle button -->
    <div class="foot-hide foot-box" onclick="toggleFooter()">
        <i id="hidetoleft" class="icon iconfont icon-arrowlefttoleft"></i>
    </div>

    <!-- Bottom bar phone entry -->
    <div class="foot-phone foot-box">
        <a class="a-open" 
           href="" 
           target="_blank" 
           rel="noopener"
           id="footerWhatsappLink">
             <i class="icon iconfont icon-whatsapp"></i>
        </a>
        <div class="show-footer_phone">
            <span class="show-phone" id="footerPhoneDisplay"></span>
        </div>
    </div>

    <!-- Bottom bar email entry -->
    <div class="foot-email foot-box">
        <a class="a-open" 
           href="" 
           target="_blank" 
           rel="noopener"
           id="footerEmailLink">
             <i class="icon iconfont icon-mail"></i>
        </a>
        <div class="show-footer_email">
            <span class="show-email" id="footerEmailDisplay"></span>
        </div>
    </div>

    <!-- Bottom bar QR code (not enabled yet)
    <div class="foot-code foot-box">
        <i class="icon iconfont icon-erweima"></i>
        <div class="show-footer_code">
            <img src="../../images/code.png" alt="Support QR code">
        </div>
    </div>
    -->

    <!-- Bottom bar back-to-top (not enabled yet)
    <div class="foot-totop foot-box" onclick="toTop()">
        <i class="icon-foot fa fa-light fa-arrow-up fa-lg "></i>
    </div>
    -->
</footer>

<script>
    // Configuration - change the contact details here and every usage updates automatically
    const contactConfig = {
        phone: '8613800000000',       // Phone number (used for the link)
        phoneDisplay: '+86 15862618383', // The phone number shown
        email: 'hello@example.com' // Email address
    };

    // Initialise the contact details
    function initContactInfo() {
        // Update the sidebar contact details
        document.getElementById('whatsappLink').href = `https://api.whatsapp.com/send?phone=${contactConfig.phone}`;
        document.getElementById('phoneDisplay').textContent = contactConfig.phoneDisplay;
        document.getElementById('emailLink').href = `mailto:${contactConfig.email}`;
        document.getElementById('emailDisplay').textContent = contactConfig.email;

        // Update the bottom bar contact details
        document.getElementById('footerWhatsappLink').href = `https://api.whatsapp.com/send?phone=${contactConfig.phone}`;
        document.getElementById('footerPhoneDisplay').textContent = contactConfig.phoneDisplay;
        document.getElementById('footerEmailLink').href = `mailto:${contactConfig.email}`;
        document.getElementById('footerEmailDisplay').textContent = contactConfig.email;
    }

    // Initialise the contact details after the page loads
    window.addEventListener('DOMContentLoaded', initContactInfo);

    // Sidebar toggle counter (controls the icon rotation)
    let sidebarToggleCount = 0;
    // Bottom bar toggle counter
    let footerToggleCount = 0;

    /**
     * Toggle the sidebar's show/hide state
     * 1. Rotate the toggle button
     * 2. Slide the contact details in and out
     */
    function toggleSidebar() {
        // Get the DOM elements
        const toggleIcon = document.getElementById('hidetoright');
        const whatsappItem = document.querySelector('.contact-sidebar-phone');
        const emailItem = document.querySelector('.contact-sidebar-email');
        const codeItem = document.querySelector('.contact-sidebar-code');

        // Update the rotation (180 degrees per click)
        sidebarToggleCount += 180;
        toggleIcon.style.transform = `translate(-50%, -50%) rotate(${sidebarToggleCount}deg)`;

        // Toggle the show/hide state
        const isHidden = whatsappItem.style.transform === 'translateX(100px)';
        if (isHidden) {
            // Show the element
            whatsappItem.style.transform = 'translateX(0)';
            emailItem.style.transform = 'translateX(0)';
            if (codeItem) codeItem.style.transform = 'translateX(0)';
        } else {
            // Hide the element
            whatsappItem.style.transform = 'translateX(100px)';
            emailItem.style.transform = 'translateX(100px)';
            if (codeItem) codeItem.style.transform = 'translateX(100px)';
        }
    }

    /**
     * Toggle the bottom bar's show/hide state
     * 1. Rotate the toggle button
     * 2. Slide the contact details in and out
     */
    function toggleFooter() {
        // Get the DOM elements
        const toggleIcon = document.getElementById('hidetoleft');
        const whatsappItem = document.querySelector('.foot-phone');
        const emailItem = document.querySelector('.foot-email');
        const codeItem = document.querySelector('.foot-code');

        // Update the rotation (180 degrees per click)
        footerToggleCount += 180;
        toggleIcon.style.transform = `translate(-50%, -50%) rotate(${footerToggleCount}deg)`;

        // Toggle the show/hide state
        const isHidden = whatsappItem.style.transform === 'translateX(-1000px)';
        if (isHidden) {
            // Show the element
            whatsappItem.style.transform = 'translateX(0)';
            emailItem.style.transform = 'translateX(0)';
            if (codeItem) codeItem.style.transform = 'translateX(0)';
        } else {
            // Hide the element
            whatsappItem.style.transform = 'translateX(-1000px)';
            emailItem.style.transform = 'translateX(-1000px)';
            if (codeItem) codeItem.style.transform = 'translateX(-1000px)';
        }
    }

    /**
     * Scroll back to the top
     * Handles the different ways browsers report scroll height
     */
    function toTop() {
        // Modern browsers
        if (window.scrollTo) {
            window.scrollTo(0, 0);
        } else {
            // Older browsers
            document.body.scrollTop = 0;
            document.documentElement.scrollTop = 0;
        }
    }
</script>
<style>
/* Base styles for the icon container */
.icon-box {
    width: 50px;
    height: 50px;
    /* Circle border colour (currently commented out) */
    /* border: 2px solid #c9c9c9; */
    border-radius: 50%;
    position: relative;
    /* Background colour inside the circle */
    background-color: rgba(255, 255, 255, 0.25);
    margin-bottom: 5px;
}

/* Shared icon styles */
.icon {
    /* Sidebar icon colour */
    color: #fff;
    position: absolute;
    top: 50%;
    left: 50%;
    transform: translate(-50%, -50%);
    transform-origin: 50% 50%;
}

/* Adjustments for specific icons */
.icon-arrowrighttoright {
    font-size: 30px !important;
}

.icon-mail {
    font-size: 20px !important;
    top: 47%; /* Fine-tune the mail icon's vertical position */
}

.icon-whatsapp {
    font-size: 20px !important;
}

.icon-weixin {
    font-size: 30px;
}

/* Colour definitions for sidebar elements */
.contact-sidebar-hide {
    /* Background colour of the hide button */
    background-color: #1C5E9A;
}

.contact-sidebar-phone {
    /* Phone icon background colour */
    background-color: #1C5E9A;
}

.contact-sidebar-email {
    /* Email icon background colour */
    background-color: #1C5E9A;
}

.contact-sidebar-code {
    /* QR code icon background colour */
    background-color: #1C5E9A;
}

/* Bottom bar element styles */
.foot-hide {
    /* Bottom hide button background colour */
    background-color: #1C5E9A;
    width: 60px !important;
    height: 50px; /* Explicit height so the icon is not clipped */
    z-index: 9999; /* Make sure it renders above other elements */
}

.foot-phone,
.foot-email,
.foot-code {
    background-color: #1C5E9A;
    transition: all 1s ease; /* Smooth transition */
}

/* Bottom bar container styles */
.foot-box {
    /* Bottom border colour (currently commented out) */
    /* border: 2px solid #fff; */
    margin: 0px -1px 0px 0px;
    width: 50%;
    cursor: pointer; /* Show a pointer on hover */
    position: relative;
}

/* Border adjustments for bottom bar elements */
.foot-box:nth-child(2),
.foot-box:nth-child(3),
.foot-box:nth-child(4) {
    border-left: 0px;
}

/* Overall bottom bar styles */
.footerbar {
    z-index: 9999; /* Make sure it sits above the page content */
    position: fixed;
    left: 0;
    bottom: 0;
    width: 100%;
    height: 50px;
    text-align: center;
    display: flex;
    justify-content: space-around;
    transition: all 0.3s linear; /* Smooth transition effect */
}

/* Bottom bar icon styles */
.icon-foot {
    /* Bottom icon colour */
    color: rgb(86, 86, 243);
    position: absolute;
    left: 50%;
    top: 50%;
    transform: translate(-50%, -50%);
}

/* Pop-up message styles */
.code > .show-code,
.email > .show-email,
.phone > .show-phone {
    /* Sidebar pop-up text size */
    font-size: 18px;
    white-space: nowrap; /* Prevent text wrapping */
    padding: 0px 20px;
}

/* Overall sidebar styles */
.contact-sidebar {
    position: fixed;
    z-index: 9999; /* Make sure it sits above the page content */
    right: 0;
    bottom: 15%;
    padding: 6px 6px 0;
    border-radius: 20px 0 0 20px; /* Rounded corner on the right */
}

/* Animation for sidebar elements */
.contact-sidebar-phone {
    transition: all 1.2s; /* Transition time for the phone icon */
}

.contact-sidebar-email {
    transition: all 0.9s; /* Transition time for the email icon */
}

.contact-sidebar-code {
    transition: all 0.6s; /* Transition time for the QR code icon */
}

.icon-arrowlefttoleft {
    font-size: 30px !important; /* Make the bottom arrow bigger so it matches the sidebar arrow */
}
    
.icon-arrowlefttoleft,
.icon-arrowrighttoright {
    transition: all 0.3s; /* Transition time for the arrow icon */
}

/* Styles for elements inside the sidebar */
.contact-sidebar > div {
    cursor: pointer; /* Show a pointer on hover */
    text-align: center;
}

.contact-sidebar > div h3 {
    font-size: 15px;
    font-weight: 500;
    color: #fff;
}

/* Sidebar pop-up styles */
.contact-sidebar > div .code,
.contact-sidebar > div .email,
.contact-sidebar > div .phone,
.contact-sidebar > div .hide {
    padding: 6px;
    align-items: center;
    display: none; /* Hidden by default */
    position: absolute;
    z-index: 9999; /* Make sure it renders above the icon */
    top: 15%;
    right: 70px; /* Show it to the left of the icon */
    border-radius: 8px;
    box-shadow: 8px 8px 8px 8px rgba(88, 95, 110, 0.22); /* Drop shadow */
    background-color: #f7f7f7;
}

/* Bottom bar pop-up styles */
.footerbar > div .show-footer_code,
.footerbar > div .show-footer_email,
.footerbar > div .show-footer_phone {
    padding: 6px;
    align-items: center;
    display: none; /* Hidden by default */
    position: absolute;
    z-index: 9999; /* Make sure it renders above the icon */
    bottom: 110%; /* Show it above the icon */
    font-size: 10px;
    border-radius: 8px;
    box-shadow: 8px 8px 8px 8px rgba(88, 95, 110, 0.22); /* Drop shadow */
    background-color: #f7f7f7;
}

/* Arrow styles for the sidebar pop-up */
.contact-sidebar > div .email:after,
.contact-sidebar > div .phone:after,
.contact-sidebar > div .code:after {
    position: absolute;
    top: 50%;
    left: 100%; /* Show the arrow on the right */
    content: '';
    transform: translateY(-50%);
    border-width: 5px;
    border-style: solid;
    border-color: transparent transparent transparent #ffffff; /* Triangle arrow */
}

/* Show the pop-up on hover */
.contact-sidebar-email:hover .email,
.contact-sidebar-phone:hover .phone,
.contact-sidebar-code:hover .code,
.foot-email:hover .show-footer_email,
.foot-phone:hover .show-footer_phone,
.foot-code:hover .show-footer_code {
    display: block;
}

/* QR code image styles */
.show-footer_code > img,
.code > img {
    width: 80px !important;
}

/* Phone pop-up width */
.phone {
    width: 200px;
}

/* Link styles */
.a-lg {
    width: 100px;
    height: 100px;
}

.a-open {
    display: block;
    height: 50px;
    border-radius: 50px;
}

/* Responsive visibility */
@media (min-width: 770px) {
    /* Hide the bottom bar on large screens */
    .footerbar {
        display: none;
    }
}

@media (max-width: 770px) {
    /* Hide the sidebar on small screens */
    .contact-sidebar {
        display: none;
    }
}
</style>

Related posts

Building an industrial website with Astro

I built LIANXIN's industrial machinery website with Astro. It has a product catalogue, a factory showcase, and Directus-powered news and an AI product assistant. On a site like this, a lot of decisions come down to one question: which content should be handed straight to the user, and which features should only start up when they are actually needed. Machine photos, specification tables and copy are better generated ahead of time; news has to update at any moment; carousels, enquiries and video each have their own interactions. Once those boundaries are clear, the implementation goes much more smoothly. The factory poster the site uses now. Source: the LIANXIN website. Pages first, interactions on demand One thing I like about Astro is that it lets me organise a page starting from HTML. Product copy and images render first; React comes in only where state and events are needed. Having the React integration installed does not mean turning the whole page into a client-side app. The site navigation uses client:load, so it activates as the page loads; the product carousel uses client:visible, loading and hydrating when it enters the viewport. Both approaches output HTML first; the difference is when the component starts running in the browser. For the exact timing, see Astro's client directives documentation. FAQ goes further and uses a client:interaction directive registered by the project itself. It starts loading on hover, touch or keyboard focus. There is a small trap here: a user might click a button before loading finishes, so the directive holds that click and replays it once the component is ready. Ordinary links navigate as usual. Saving JavaScript is fine — just don't save the visitor's first click. News takes a different route. The list and detail pages read Directus per request, while the latest news on the homepage is left to server:defer. The homepage returns its main body and placeholders first, and the news block requests its HTML separately afterwards. That way a slow CMS response does not hold up the whole page. This part needs a server, so I run the site with the Node adapter in standalone mode. Astro's official diagram showing how a static page and a dynamic block get their content separately. Source: Astro 5.0, &copy; Astro; this is not a diagram of this site's deployment. Products and the AI share one source of truth The products come in several series, and each model has photos, specifications and application notes. If all of that is scattered across pages, changing one specification means hunting down every place it appears. I organised the products into TypeScript data and let the pages read from it. The model detail pages reuse a single template and generate their routes with getStaticPaths(). Here is the path generation from the detail page, with imports and the page template omitted. export function getStaticPaths() { return products.map((product) => ({ params: { category: product.category, slug: product.slug, }, props: { product, category: getCategory(product.category), }, })); } The specification tables read that data, and the Product structured data on the page reads it too. The AI product knowledge is generated from the same source, so the assistant isn't reciting an old version after the website has been updated. The data model keeps explicit fields for model, category, images and specs; the pages only display them. The AI backend is a separate Cloudflare Worker. It searches for material based on the model, aliases and current page in the question, picks at most six documents to hand to DeepSeek, then checks whether the source IDs attached to the answer belong to that batch. The browser gets the answer and the matching on-site links; the model key stays in the Worker. This retrieval approach is small in scale and simple in its rules, which suits this set of products. It can constrain where the sources come from; it cannot guarantee that every sentence the model produces is correct. Specific selections and quotations still need a human to confirm. Also, sharing a source file does not mean it goes live automatically. After product data changes, both the main site and the assistant Worker need to be rebuilt and deployed; that step is easy to miss. Images are about composition, video is about timing Industrial equipment is long to begin with. Add a few heavy frames around it and the machine you can actually see gets smaller and smaller. For product photos I use object-fit: contain to keep the whole shape; the title, selling points and buttons sit beside it, giving the image enough room. The carousel controls stay on either side so you don't have to scroll down to change slides. A showcase image of the IBM 80E, with the machine's outline kept intact. Source: the corresponding LIANXIN model page. For the homepage poster I prepared landscape and portrait versions and switch between them with <picture> using max-aspect-ratio: 1/1. The choice follows the shape of the viewport, so a portrait tablet still gets a portrait composition. The first poster loads eagerly and the rest are lazy-loaded. The copy currently lives inside the posters too, which buys more direct control over layout at the cost of re-exporting images whenever the text changes or a language is added. Video is handled more bluntly. The factory introduction shows a cover first and keeps the video address in data-src, assigning it to src only when the visitor clicks play. Someone who is just browsing the page doesn't end up downloading a few minutes of video along the way. The key action in the playback function looks like this, with the loading hint, timeout and error handling omitted. if (!video.hasAttribute("src")) { video.src = video.dataset.src!; } void video.play(); Native <video> plus one custom element to manage playback state is enough here. Slow networks get a loading hint; failures get a retry button and a link to the original video; leaving the component aborts the event listener and pauses playback. At least the user can tell what happened after they clicked, and has a way to carry on.

Sep 7, 2026·Tech
Building an industrial website with Astro

Fatigue detection on Android

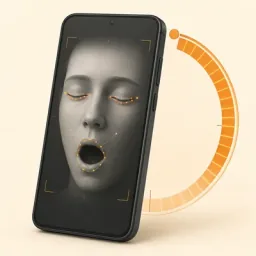
I built an Android fatigue reminder app that watches for closed eyes and an open mouth through the front camera and does the detection on the phone itself. Once the model is wired in, the real work is the judgement that comes after it. Alert on a single blink and the reminders quickly turn into noise; keep showing normal when the camera can't see anything and you mislead people about what the system can do. First, measure the eyes and the mouth The project uses ML Kit Face Detection, with the model bundled into the APK so there is no download to wait for after installation. It provides the face contour, mouth landmarks and eye-open probabilities, while the fatigue rules are implemented in the app. That keeps detection and judgement separate: changing a duration does not mean touching the camera code. The model extracts face information; when to raise a reminder is decided by the rules afterwards. The illustration comes from Google's ML Kit documentation. The eyes use EAR, the eye aspect ratio. Take six points from the eye contour, add the two upper-to-lower eyelid distances, and divide by twice the eye width. The formula is EAR = (one eyelid distance + the other) &divide; (2 &times; eye width). When the eye closes, the height shrinks and EAR usually drops. Working with a ratio reduces the effect of how far away the face is, but side angles, occlusion and landmark drift still affect the result. Google ML Kit's official contour example; click the image to see the original. Keep the eyelid and lip points straight — the MAR in this article measures the outer lip edge. This is the official example, not a screenshot from this app.Image source. The mouth uses MAR. In this project it is the distance from the centre of the upper outer lip to the centre of the lower outer lip, divided by the distance between the mouth corners. The formula looks simple, but where you put the points is not something you can wave away. Measuring the outer lip and measuring the opening inside the mouth give you different numbers; copying a threshold off the internet is quite likely to be wrong for your case. I also kept ML Kit's eye-open probability and OR it with EAR: if either path meets the condition, the matching timer starts. The probability path requires valid values for both eyes. That lets both signals take part on their own, but it also means an error in one path can trigger a candidate; they come from the same detector, so they are not two independent pieces of evidence. The mouth is judged separately, so when the eyes are temporarily unusable a valid MAR can still take part. Crossing a line once does not count as an action yet A single frame only tells you how narrow the eyes are and how wide the mouth is at that instant. Separating a blink, a brief mouth opening and a sustained action needs time on top of that. The current ordinary eye-closure condition is EAR &le; 0.22, or either eye below 0.35 when both probabilities are valid, held for 800 ms to enter WARNING. The stronger condition is 0 < EAR < 0.17, or both probabilities below 0.35, held for 400 ms to enter DANGER, which takes priority. The yawn candidate uses two thresholds. The timer only starts once MAR passes 0.40, and after that it keeps running as long as MAR stays at or above 0.35, reaching 800 ms cumulative before it reminds you. If the value wobbles between 0.41, 0.39 and 0.42, a single threshold would reset the timer over and over. The mouth is still open, but the timer has closed itself for you. The key branch in the code is only a few lines. Below is an excerpt from the decision logic, with the invalid-value checks and the timing that follows omitted. val yawning = mar != null && if (highMarStartMs == null) { mar > config.marYawnEnterThreshold // 0.40 } else { mar >= config.marYawnExitThreshold // 0.35 } The time comes from the camera frame's timestamp, not from the moment the model callback finishes. Otherwise a slower inference this time and a faster one next time would be mixed into the action duration. When two valid observations are more than 1.5 seconds apart, the unfinished timer is cleared and starts again from the current frame. With no frames in between, the system has no basis for joining two mouth openings into one continuous action. That interval is an engineering trade-off too; it cannot prove what happened between samples. If it cannot see clearly, don't keep reporting normal Besides NORMAL, WARNING and DANGER, the judge keeps a DEGRADED state. When there is no face, when all the eye and mouth signals are invalid, or when a dark frame or a camera error is detected, it clears the unfinished timers and shows the reason it currently cannot detect reliably. NORMAL also only means that the current valid signals have not met the reminder condition; it must not be read as the driver being alert. On the camera side, acquireLatestImage() takes the newest analysis frame, and if the current session already has an inference task running, the new frame is released immediately so the app does not fall further and further behind. When detection stops or the app goes to the background, the session number increases; an old task that returns late must not overwrite the newer state. After detection restarts, the timing starts again from the new frames as well. Sound and vibration are only triggered by DANGER; WARNING just updates the interface. The danger alert has a cooldown of about two seconds and is sent through a SharedFlow that does not replay historical events; the interface only receives it while resumed in the foreground, so pausing stops the prompts. Otherwise, coming back to the app would suddenly fire a reminder about something that already happened. As it stands, this implementation is still a research prototype with fixed thresholds and no personal calibration. A sustained open mouth can also come from talking, and the eye-open probability is limited by the face angle. On the phone side I have only verified installation, the camera pipeline and foreground/background switching on an emulator; real-person detection, overlay accuracy, and the sound and vibration still need testing on a target device. The more worthwhile next step is to record normal speech, brief mouth openings, natural yawns and closed eyes, and use them to check false positives and misses in a static setting; this prototype is not yet a road-validated driving safety system.

Sep 7, 2026·Tech
Fatigue detection on Android

A few pitfalls in MediaPipe hand gesture recognition

This time I built an offline hand gesture recogniser on a LubanCat 3, running Android 14. The camera sees a hand, draws the skeleton, and when you make an OK sign it automatically saves a screenshot with the skeleton drawn on it. The model is Google's MediaPipe. It already finds 21 hand keypoints and classifies seven static gestures. What is left for you is the camera, the screen coordinates, and turning recognition results into actual actions. Use the model as it comes The Android side is written in Kotlin, the camera uses CameraX, and recognition uses MediaPipe Tasks. These are the dependencies. def cameraxVersion = '1.4.2' implementation "androidx.camera:camera-core:$cameraxVersion" implementation "androidx.camera:camera-camera2:$cameraxVersion" implementation "androidx.camera:camera-lifecycle:$cameraxVersion" implementation 'com.google.mediapipe:tasks-vision:1.0.0' Put the official model into app/src/main/assets, point the recogniser at that file when you create it, set the running mode to LIVE_STREAM and take results from the callback. The official Android example already wires it up completely; reading that is faster than guessing from an empty project. The model ships inside the APK and inference runs on the board, so at runtime it only needs camera permission. The base image comes from MediaPipe's official test image; this is the board-side output from this project. The red dots are joints, the blue lines mark the thumb, and the remaining connections are green. Don't open two camera streams The usual CameraX setup uses Preview to show the image and ImageAnalysis to feed frames to the model. On the firmware for my RK3576 board, opening both at once hangs. In the end I kept a single ImageAnalysis and shared it between preview and recognition. After getting a 1920&times;1080 image, I handle the row stride, scale the longest side down to 640 pixels, then rotate and mirror it consistently before feeding it to the model. The frame strategy is KEEP_ONLY_LATEST: if it cannot keep up, drop the old frames instead of queueing recognition. The current code also throttles submissions to at least 100 ms apart, so the submission rate tops out at roughly 10 frames per second; what you actually see still depends on the inference callback. Always close ImageProxy when you are done, including on skipped frames and error paths. If the buffer is held, the camera may simply stop producing frames later. Also, on the board, CAM0, Android's Camera ID 0 and /dev/video0 have to be checked separately. This project checks the physical m00_ module, the logical ID 0 and the current firmware's FRONT attribute together, and stops if the conditions are not met. That mapping only holds for the board and firmware I verified. Why the skeleton drifts You have to look at both coordinates and timing. On coordinates: the model returns normalised keypoints, but the preview uses centerCrop. The image is scaled up first and then cropped to the display area. Multiplying keypoints by the screen size directly obviously will not line up. To project keypoints onto the screen you have to use the same scale and crop offset as the preview. Below, x and y are the normalised coordinates from the model, and srcW, srcH are the width and height of the model's input image. scale = max(viewW / srcW, viewH / srcH) offsetX = (viewW - srcW * scale) / 2 offsetY = (viewH - srcH * scale) / 2 screenX = x * srcW * scale + offsetX screenY = y * srcH * scale + offsetY These divisions need floating point. Rotation and mirroring are also handled before inference so that the preview and the model do not each compute their own direction. On timing: the hand has already moved away and the previous frame's result comes back. Overlaying an old skeleton on a new image is a bit like an out-of-body experience. My fix is to take the matching input image out of the result callback and update the interface with this frame's keypoints at the same time. The image and the skeleton have to belong to the same frame. The cost is that the display waits for the recognition result, and preview smoothness suffers with it. There is another condition that is easy to miss. A classification result of None only means no supported gesture was recognised. As long as the keypoints are there, keep drawing the skeleton; only clear it when no hand is detected, the result is stale, or the app goes to the background. The OK screenshot needs burst protection None of the official seven classes is OK, so I added a geometric check on top of the existing keypoints: the thumb tip and index tip close together, the index finger bent, and the other three fingers straight. Distances are normalised by palm size and combined with joint angles. With a fixed pixel distance, extending your hand a little further makes the threshold wrong. This uses the 2D coordinates restored from the input dimensions, so it stays consistent with the skeleton on screen. Only then comes the trigger control. Every frame of video can recognise an OK, so if you keep holding your hand up it keeps saving images, and the photo library cannot take that. Condition Current rule Confirm the gesture At least 4 strong matches in the most recent 5 frames, with the current frame matching too, and the window lasting at least 300 ms Lock after triggering Hold the OK sign and only one photo is taken Allow another photo Leave OK for at least 600 ms, and at least 1.5 seconds between triggers Make the trigger condition strict and the hold condition loose, to reduce jitter around the boundary. If sampling breaks for more than 400 ms, the old observation window is cleared. These are the current settings; actual trigger timing still depends on the frame rate. The screenshot composites the current image and the skeleton from the same frame, then saves it as a PNG through MediaStore. Only those two layers are drawn, so the status bar and dialogs do not get mixed in. Encoding and writing to disk go on a separate thread so they do not block camera recognition. What is saved is a composite of the displayed image; the input was already scaled down, so it is not the sensor's original image. This version still runs Delegate.CPU. The RK3576 has an NPU, but an app needs RKNN integration to use it. RKNN's official pipeline includes model conversion and runtime integration, and the pre- and post-processing have to be realigned too; changing one setting will not do it.

Sep 7, 2026·Tech
A few pitfalls in MediaPipe hand gesture recognition
Music