Category: Tech12 posts
Building an industrial website with Astro➔
I built LIANXIN's industrial machinery website with Astro. It has a product catalogue, a factory showcase, and Directus-powered news and an AI product assistant. On a site like this, a lot of decisions come down to one question: which content should be handed straight to the user, and which features should only start up when they are actually needed. Machine photos, specification tables and copy are better generated ahead of time; news has to update at any moment; carousels, enquiries and video each have their own interactions. Once those boundaries are clear, the implementation goes much more smoothly. The factory poster the site uses now. Source: the LIANXIN website. Pages first, interactions on demand One thing I like about Astro is that it lets me organise a page starting from HTML. Product copy and images render first; React comes in only where state and events are needed. Having the React integration installed does not mean turning the whole page into a client-side app. The site navigation uses client:load, so it activates as the page loads; the product carousel uses client:visible, loading and hydrating when it enters the viewport. Both approaches output HTML first; the difference is when the component starts running in the browser. For the exact timing, see Astro's client directives documentation. FAQ goes further and uses a client:interaction directive registered by the project itself. It starts loading on hover, touch or keyboard focus. There is a small trap here: a user might click a button before loading finishes, so the directive holds that click and replays it once the component is ready. Ordinary links navigate as usual. Saving JavaScript is fine — just don't save the visitor's first click. News takes a different route. The list and detail pages read Directus per request, while the latest news on the homepage is left to server:defer. The homepage returns its main body and placeholders first, and the news block requests its HTML separately afterwards. That way a slow CMS response does not hold up the whole page. This part needs a server, so I run the site with the Node adapter in standalone mode. Astro's official diagram showing how a static page and a dynamic block get their content separately. Source: Astro 5.0, © Astro; this is not a diagram of this site's deployment. Products and the AI share one source of truth The products come in several series, and each model has photos, specifications and application notes. If all of that is scattered across pages, changing one specification means hunting down every place it appears. I organised the products into TypeScript data and let the pages read from it. The model detail pages reuse a single template and generate their routes with getStaticPaths(). Here is the path generation from the detail page, with imports and the page template omitted. export function getStaticPaths() { return products.map((product) => ({ params: { category: product.category, slug: product.slug, }, props: { product, category: getCategory(product.category), }, })); } The specification tables read that data, and the Product structured data on the page reads it too. The AI product knowledge is generated from the same source, so the assistant isn't reciting an old version after the website has been updated. The data model keeps explicit fields for model, category, images and specs; the pages only display them. The AI backend is a separate Cloudflare Worker. It searches for material based on the model, aliases and current page in the question, picks at most six documents to hand to DeepSeek, then checks whether the source IDs attached to the answer belong to that batch. The browser gets the answer and the matching on-site links; the model key stays in the Worker. This retrieval approach is small in scale and simple in its rules, which suits this set of products. It can constrain where the sources come from; it cannot guarantee that every sentence the model produces is correct. Specific selections and quotations still need a human to confirm. Also, sharing a source file does not mean it goes live automatically. After product data changes, both the main site and the assistant Worker need to be rebuilt and deployed; that step is easy to miss. Images are about composition, video is about timing Industrial equipment is long to begin with. Add a few heavy frames around it and the machine you can actually see gets smaller and smaller. For product photos I use object-fit: contain to keep the whole shape; the title, selling points and buttons sit beside it, giving the image enough room. The carousel controls stay on either side so you don't have to scroll down to change slides. A showcase image of the IBM 80E, with the machine's outline kept intact. Source: the corresponding LIANXIN model page. For the homepage poster I prepared landscape and portrait versions and switch between them with <picture> using max-aspect-ratio: 1/1. The choice follows the shape of the viewport, so a portrait tablet still gets a portrait composition. The first poster loads eagerly and the rest are lazy-loaded. The copy currently lives inside the posters too, which buys more direct control over layout at the cost of re-exporting images whenever the text changes or a language is added. Video is handled more bluntly. The factory introduction shows a cover first and keeps the video address in data-src, assigning it to src only when the visitor clicks play. Someone who is just browsing the page doesn't end up downloading a few minutes of video along the way. The key action in the playback function looks like this, with the loading hint, timeout and error handling omitted. if (!video.hasAttribute("src")) { video.src = video.dataset.src!; } void video.play(); Native <video> plus one custom element to manage playback state is enough here. Slow networks get a loading hint; failures get a retry button and a link to the original video; leaving the component aborts the event listener and pauses playback. At least the user can tell what happened after they clicked, and has a way to carry on.

Fatigue detection on Android➔
I built an Android fatigue reminder app that watches for closed eyes and an open mouth through the front camera and does the detection on the phone itself. Once the model is wired in, the real work is the judgement that comes after it. Alert on a single blink and the reminders quickly turn into noise; keep showing normal when the camera can't see anything and you mislead people about what the system can do. First, measure the eyes and the mouth The project uses ML Kit Face Detection, with the model bundled into the APK so there is no download to wait for after installation. It provides the face contour, mouth landmarks and eye-open probabilities, while the fatigue rules are implemented in the app. That keeps detection and judgement separate: changing a duration does not mean touching the camera code. The model extracts face information; when to raise a reminder is decided by the rules afterwards. The illustration comes from Google's ML Kit documentation. The eyes use EAR, the eye aspect ratio. Take six points from the eye contour, add the two upper-to-lower eyelid distances, and divide by twice the eye width. The formula is EAR = (one eyelid distance + the other) ÷ (2 × eye width). When the eye closes, the height shrinks and EAR usually drops. Working with a ratio reduces the effect of how far away the face is, but side angles, occlusion and landmark drift still affect the result. Google ML Kit's official contour example; click the image to see the original. Keep the eyelid and lip points straight — the MAR in this article measures the outer lip edge. This is the official example, not a screenshot from this app.Image source. The mouth uses MAR. In this project it is the distance from the centre of the upper outer lip to the centre of the lower outer lip, divided by the distance between the mouth corners. The formula looks simple, but where you put the points is not something you can wave away. Measuring the outer lip and measuring the opening inside the mouth give you different numbers; copying a threshold off the internet is quite likely to be wrong for your case. I also kept ML Kit's eye-open probability and OR it with EAR: if either path meets the condition, the matching timer starts. The probability path requires valid values for both eyes. That lets both signals take part on their own, but it also means an error in one path can trigger a candidate; they come from the same detector, so they are not two independent pieces of evidence. The mouth is judged separately, so when the eyes are temporarily unusable a valid MAR can still take part. Crossing a line once does not count as an action yet A single frame only tells you how narrow the eyes are and how wide the mouth is at that instant. Separating a blink, a brief mouth opening and a sustained action needs time on top of that. The current ordinary eye-closure condition is EAR ≤ 0.22, or either eye below 0.35 when both probabilities are valid, held for 800 ms to enter WARNING. The stronger condition is 0 < EAR < 0.17, or both probabilities below 0.35, held for 400 ms to enter DANGER, which takes priority. The yawn candidate uses two thresholds. The timer only starts once MAR passes 0.40, and after that it keeps running as long as MAR stays at or above 0.35, reaching 800 ms cumulative before it reminds you. If the value wobbles between 0.41, 0.39 and 0.42, a single threshold would reset the timer over and over. The mouth is still open, but the timer has closed itself for you. The key branch in the code is only a few lines. Below is an excerpt from the decision logic, with the invalid-value checks and the timing that follows omitted. val yawning = mar != null && if (highMarStartMs == null) { mar > config.marYawnEnterThreshold // 0.40 } else { mar >= config.marYawnExitThreshold // 0.35 } The time comes from the camera frame's timestamp, not from the moment the model callback finishes. Otherwise a slower inference this time and a faster one next time would be mixed into the action duration. When two valid observations are more than 1.5 seconds apart, the unfinished timer is cleared and starts again from the current frame. With no frames in between, the system has no basis for joining two mouth openings into one continuous action. That interval is an engineering trade-off too; it cannot prove what happened between samples. If it cannot see clearly, don't keep reporting normal Besides NORMAL, WARNING and DANGER, the judge keeps a DEGRADED state. When there is no face, when all the eye and mouth signals are invalid, or when a dark frame or a camera error is detected, it clears the unfinished timers and shows the reason it currently cannot detect reliably. NORMAL also only means that the current valid signals have not met the reminder condition; it must not be read as the driver being alert. On the camera side, acquireLatestImage() takes the newest analysis frame, and if the current session already has an inference task running, the new frame is released immediately so the app does not fall further and further behind. When detection stops or the app goes to the background, the session number increases; an old task that returns late must not overwrite the newer state. After detection restarts, the timing starts again from the new frames as well. Sound and vibration are only triggered by DANGER; WARNING just updates the interface. The danger alert has a cooldown of about two seconds and is sent through a SharedFlow that does not replay historical events; the interface only receives it while resumed in the foreground, so pausing stops the prompts. Otherwise, coming back to the app would suddenly fire a reminder about something that already happened. As it stands, this implementation is still a research prototype with fixed thresholds and no personal calibration. A sustained open mouth can also come from talking, and the eye-open probability is limited by the face angle. On the phone side I have only verified installation, the camera pipeline and foreground/background switching on an emulator; real-person detection, overlay accuracy, and the sound and vibration still need testing on a target device. The more worthwhile next step is to record normal speech, brief mouth openings, natural yawns and closed eyes, and use them to check false positives and misses in a static setting; this prototype is not yet a road-validated driving safety system.

A few pitfalls in MediaPipe hand gesture recognition➔
This time I built an offline hand gesture recogniser on a LubanCat 3, running Android 14. The camera sees a hand, draws the skeleton, and when you make an OK sign it automatically saves a screenshot with the skeleton drawn on it. The model is Google's MediaPipe. It already finds 21 hand keypoints and classifies seven static gestures. What is left for you is the camera, the screen coordinates, and turning recognition results into actual actions. Use the model as it comes The Android side is written in Kotlin, the camera uses CameraX, and recognition uses MediaPipe Tasks. These are the dependencies. def cameraxVersion = '1.4.2' implementation "androidx.camera:camera-core:$cameraxVersion" implementation "androidx.camera:camera-camera2:$cameraxVersion" implementation "androidx.camera:camera-lifecycle:$cameraxVersion" implementation 'com.google.mediapipe:tasks-vision:1.0.0' Put the official model into app/src/main/assets, point the recogniser at that file when you create it, set the running mode to LIVE_STREAM and take results from the callback. The official Android example already wires it up completely; reading that is faster than guessing from an empty project. The model ships inside the APK and inference runs on the board, so at runtime it only needs camera permission. The base image comes from MediaPipe's official test image; this is the board-side output from this project. The red dots are joints, the blue lines mark the thumb, and the remaining connections are green. Don't open two camera streams The usual CameraX setup uses Preview to show the image and ImageAnalysis to feed frames to the model. On the firmware for my RK3576 board, opening both at once hangs. In the end I kept a single ImageAnalysis and shared it between preview and recognition. After getting a 1920×1080 image, I handle the row stride, scale the longest side down to 640 pixels, then rotate and mirror it consistently before feeding it to the model. The frame strategy is KEEP_ONLY_LATEST: if it cannot keep up, drop the old frames instead of queueing recognition. The current code also throttles submissions to at least 100 ms apart, so the submission rate tops out at roughly 10 frames per second; what you actually see still depends on the inference callback. Always close ImageProxy when you are done, including on skipped frames and error paths. If the buffer is held, the camera may simply stop producing frames later. Also, on the board, CAM0, Android's Camera ID 0 and /dev/video0 have to be checked separately. This project checks the physical m00_ module, the logical ID 0 and the current firmware's FRONT attribute together, and stops if the conditions are not met. That mapping only holds for the board and firmware I verified. Why the skeleton drifts You have to look at both coordinates and timing. On coordinates: the model returns normalised keypoints, but the preview uses centerCrop. The image is scaled up first and then cropped to the display area. Multiplying keypoints by the screen size directly obviously will not line up. To project keypoints onto the screen you have to use the same scale and crop offset as the preview. Below, x and y are the normalised coordinates from the model, and srcW, srcH are the width and height of the model's input image. scale = max(viewW / srcW, viewH / srcH) offsetX = (viewW - srcW * scale) / 2 offsetY = (viewH - srcH * scale) / 2 screenX = x * srcW * scale + offsetX screenY = y * srcH * scale + offsetY These divisions need floating point. Rotation and mirroring are also handled before inference so that the preview and the model do not each compute their own direction. On timing: the hand has already moved away and the previous frame's result comes back. Overlaying an old skeleton on a new image is a bit like an out-of-body experience. My fix is to take the matching input image out of the result callback and update the interface with this frame's keypoints at the same time. The image and the skeleton have to belong to the same frame. The cost is that the display waits for the recognition result, and preview smoothness suffers with it. There is another condition that is easy to miss. A classification result of None only means no supported gesture was recognised. As long as the keypoints are there, keep drawing the skeleton; only clear it when no hand is detected, the result is stale, or the app goes to the background. The OK screenshot needs burst protection None of the official seven classes is OK, so I added a geometric check on top of the existing keypoints: the thumb tip and index tip close together, the index finger bent, and the other three fingers straight. Distances are normalised by palm size and combined with joint angles. With a fixed pixel distance, extending your hand a little further makes the threshold wrong. This uses the 2D coordinates restored from the input dimensions, so it stays consistent with the skeleton on screen. Only then comes the trigger control. Every frame of video can recognise an OK, so if you keep holding your hand up it keeps saving images, and the photo library cannot take that. Condition Current rule Confirm the gesture At least 4 strong matches in the most recent 5 frames, with the current frame matching too, and the window lasting at least 300 ms Lock after triggering Hold the OK sign and only one photo is taken Allow another photo Leave OK for at least 600 ms, and at least 1.5 seconds between triggers Make the trigger condition strict and the hold condition loose, to reduce jitter around the boundary. If sampling breaks for more than 400 ms, the old observation window is cleared. These are the current settings; actual trigger timing still depends on the frame rate. The screenshot composites the current image and the skeleton from the same frame, then saves it as a PNG through MediaStore. Only those two layers are drawn, so the status bar and dialogs do not get mixed in. Encoding and writing to disk go on a separate thread so they do not block camera recognition. What is saved is a composite of the displayed image; the input was already scaled down, so it is not the sensor's original image. This version still runs Delegate.CPU. The RK3576 has an NPU, but an app needs RKNN integration to use it. RKNN's official pipeline includes model conversion and runtime integration, and the pre- and post-processing have to be realigned too; changing one setting will not do it.

The frameworks you overlook when SEO isn't on your radar: Next.js and Nuxt.js➔
Introduction In ordinary React or Vue development, front-end engineers mostly build single-page applications. Those apps do state management and partial refreshes well, and they are pleasant to work with. But when the business needs to grow through organic search traffic, the SPA hits a technical ceiling. The usual answer is to bring in Next.js or Nuxt.js. 1. What Next.js and Nuxt.js are Next.js and Nuxt.js are isomorphic front-end frameworks built on React and Vue respectively. React and Vue by default render on the client: the server returns an HTML document with the basic structure, and generating every DOM node plus fetching data is left to JavaScript that the browser downloads and runs. What Next.js and Nuxt.js add is SSR, server-side rendering, and SSG, static site generation. They move page rendering earlier — onto the server or into the build step — and hand the browser a page that already contains the complete HTML structure. 2. What they are good for The core value of these two frameworks in engineering practice comes down to two things: The first is search engine optimisation, SEO. When mainstream search crawlers fetch a page, their ability to handle complex JavaScript that loads data asynchronously is very limited. A traditional SPA usually looks like a blank page to a crawler, so the content never gets indexed. With server-side rendering, the crawler can read rendered structured text and links directly, which protects both indexing and ranking. The second is a faster first paint. Because the server returns the complete HTML, the browser does not have to wait for a large JS bundle to download before it can run the rendering logic. For consumer products on constrained networks, or where core metrics like first contentful paint matter, this sharply cuts the blank-screen wait. 3. Why I recommend them Beyond SEO and first-paint performance, both frameworks are worth adopting for engineering efficiency. First, routing is simpler. Both use filesystem-based routing: create a file in the right directory following the convention and the route exists, which cuts the cost of maintaining a central routing table. Second, they carry lightweight backend capability. API routes are built in, so you can write simple backend endpoints and talk to a database inside the same project — very handy for iterating quickly on small full-stack products. Third, performance optimisation is automatic. The frameworks build in optimisations for images, fonts and third-party scripts, so you get a solid front-end performance baseline without digging into Webpack or Vite configuration. 4. Advantages and disadvantages next to Astro In content sites and SEO, Astro has drawn a lot of attention lately. Compared with Astro, the strengths and weaknesses of Next.js and Nuxt.js are fairly clear, and which one wins depends on the product. The advantage of Next.js and Nuxt.js is state management and complex interaction. If the product involves heavy front-end logic — a SaaS admin panel, a complicated form system, a collaborative tool — Next and Nuxt can reuse the whole React or Vue ecosystem, and developers pay almost no mental cost moving between client and server. The disadvantage is that the build output stays heavy. Even with SSR, Next and Nuxt still have to ship framework runtime code and state data to the client to hydrate the page, which means the overall JS bundle is hard to trim to the bone. Astro's architecture is different. It uses islands by default, with the core idea of loading JavaScript on demand. Most static pages go out as plain HTML, and JS is attached only to the components that need interaction. So for blogs, documentation centres or marketing landing pages — content-heavy, interaction-light — Astro usually beats Next and Nuxt on loading performance and bundle size. On top of that, Astro lets you mix React, Vue and other frameworks' components on one page, which gives you more freedom in choosing tools. Complex web applications with heavy interaction that still need some SEO are better served by Next.js or Nuxt.js; for content sites that are mostly static reading, Astro is the better engineering choice at this point.

Breaking the front-end framework barrier: Astro, the newcomer➔
Front-end stacks turn over extremely fast. Astro, first released in 2021, is a very young framework.As a build tool designed specifically for presenting content, its momentum in the industry and its actual results are remarkable.Recently I rebuilt the foundation of my personal site entirely on Astro.Here I'll start from the technical logic and walk through the framework's core mechanics and the development experience. 1. What makes Astro so obviously different from other mainstream frameworks? Conventional front-end frameworks like Vue or React bundle the entire application logic and send it to the browser to parse. Astro's core difference is that it strips out all client-side JavaScript by default.At build time it compiles components straight into plain static HTML. Only the parts a developer explicitly marks as interactive are shipped as scripts. That design removes the performance cost of a framework runtime entirely. 2. Why recommend Astro? 2.1 The logic is simple and easy to pick up Routing in a traditional single-page application usually means pulling in a dedicated router library and maintaining a complicated mapping table.Astro uses an intuitive, filesystem-based routing model.Create a file in a particular directory and the matching URL path exists automatically. Its global layout wrapping is extremely direct, with none of the heavy state-management burden, and the overall learning curve is lower than basic Vue. Say your project has a core folder called src/pages.You create a few files inside it.The site's URLs are generated automatically to match the hierarchy. You create src/pages/index.astro.A visitor going to www.web-chang.com opens that page directly. You create src/pages/about.astro.A visitor going to www.web-chang.com/about sees your about page. You create a blog folder under pages and add a test.astro file.That is, the physical path src/pages/blog/test.astro.A visitor going to www.web-chang.com/blog/test opens that article. You never have to maintain a router.js-style config file just to manage URL routing.Whatever your physical folder structure looks like,that is what the URL structure looks like online.This what-you-see-is-what-you-get design removes the tedious routing configuration entirely. 2.2 It asks little of the server, which saves money Dynamically rendering frameworks burn server CPU and memory continuously to handle visitor requests.Astro's purely static output asks almost nothing of the server's physical performance.The built files can be hosted on any free CDN or the smallest, cheapest node. For independent developers on a budget, that is a brutally effective way to cut costs. 2.3 Compatibility is good Choosing a front-end stack usually means being locked into one ecosystem. Astro breaks that barrier completely.Inside a single Astro page you can mix UI components written in Vue and React seamlessly. A very plain example. Say you have a top navigation bar written in Vue.And you also found a guestbook written in React somewhere online.In a traditional setup those two pieces follow completely different underlying rules and absolutely cannot run on the same page. But in an Astro page file you can put them together directly.The header region references the Vue code and the footer region references the React code.Astro resolves both syntaxes at the same time underneath and turns them into ordinary page content.They not only display correctly side by side; their click interactions don't interfere with each other at all. This underlying compatibility means that from now on, whenever you find a useful piece of open-source component code online,you don't have to care whether it was written for Vue or React — you can copy it straight into your Astro project and it runs. The compiler handles dependency isolation and loading across these technical stacks, so developers can reuse any code assets they have accumulated without obstacles. 2.4 SEO optimisation Pages that render their content with client-side scripts are extremely unfriendly to search engine crawlers.Astro's plain static HTML lets crawlers grab the complete text of the page instantly. (Compared with WordPress, which is frankly garbage at this.)It also provides complete metadata configuration out of the box. This physical pre-rendering mechanism noticeably improves how quickly a site is indexed and how much ranking weight it carries. 3. Minimal data fetching and a closed security loop Independent developers often need to get a full-stack business running quickly. Astro fits naturally with a decoupled front end and back end.It can make requests at build time to pull content from a remote database and hard-code it into the final page files.Combined with a headless backend, developers can fully separate data maintenance from the front-end presentation. This architecture physically removes the risk of exposing backend APIs, and pushes the response speed of the front-end pages to the limit. In other words, every page is crawled once and turned into an HTML file that is served directly to visitors.

Directus in practice➔
This walkthrough follows the features this site actually uses. Most of it is straightforward. The hardest part to grasp is decisions and roles; that logic gets tangled up with security tokens and the like, so it's worth thinking through carefully. 1. Creating the collection Ones I strongly recommend ticking Created at (date_created): What it does: automatically records the year, month, day, hour and minute the article was created. Why I recommend it: a blog obviously needs to show a publication time, right? Tick this and every new article gets a timestamp automatically; the frontend can simply read and display it. Updated at (date_updated): What it does: whenever you edit the article, the field is updated to the current time. Why I recommend it: the frontend can show "last modified on 2026-06-05". 2. Ones that depend on your needs Archived: What it does: it works like a draft box, or a soft delete. Why pick it: if you have written half an article and don't want to publish it, or you want to take an article down without deleting it for good, tick this. On the frontend you just filter out archived articles when you call the API. Sort: What it does: lets you drag articles in the admin to change their order. Why pick it: for a blog, sorting by date descending is usually enough, so you can leave this unticked. But if you later build a Product collection, I would strongly recommend ticking it, because products often need their display order adjusted by hand. 3. Ones you can skip (multi-user collaboration) Created by (user_created) & Updated by (user_updated): What they do: record which admin account wrote or changed the article. Why skip them: this is your personal blog and website, and you are the only person using the admin, so there is no need to record who wrote what. If a company has several people managing the backend, then these are essential. 2. Creating fields In settings you can see your model (table) Open the table and you can set up its fields Simple enough, right? You don't even have to set the field types yourself — just pick one. You will still want to read up a little on the specifics. For example, my article category field `category` uses a dropdown list The Chinese translation is hard to make sense of; I would still suggest using the English interface. For example, the rich text editor is labelled "what you see is what you get", which is literally WYSIWYG — no idea how they decided to translate it that way. Below that it will usually offer you a Content Translations option That is easy enough to understand too The body text is 你好 Underneath it you write the translation, Hello Two languages, two codes: zh and en When the interface has a translation button, Chinese requests the content under zh and English requests the content under en Once it is created, save it and you can start adding fields in the content view 2. Opening up API read permissions (the important part) The logic is easy to grasp: 1. What role (identity) are you? 2. Given your identity, what are you allowed to do? (the policy applied) For example, a visitor hitting the API (user identity) only has permission to view (the applied policy), while an admin user has update and delete permissions through the API. Inside the user roles there is a default "Public" role The note also says it does not need token verification Click into it and you will see the "Public" role has an "Images public" policy I set that up myself, because if images also required a token to fetch, it would be very easy to leak your token. I really would not recommend doing that. 3. API links Put simply You created the blog table Your domain/items/table-name gives you all the JSON data from that table There are other tricks too For example https://your-domain/items/table?filter[archived][_eq]=false&fields=id,title,article,categore That is how you filter data See the Directus documentation for the details The logic is very simple 4. How do you add a security token? This is easy to set up too Step one: make a "key" in Directus and lock it It is quite convenient, compared with how it used to be done It only takes two steps 1. Create a user and generate a token Log in to the Directus admin Click User directory in the left menu Click + Create user in the top right Fill in any name, Frontend for example. No email or password needed The most important step: scroll down on the user profile page and find the Token field You will find that saving the user generates a token automatically; save it, then come back and it will be there 2. Create a matching permission policy Set the permissions for the relevant tables Assign the account you just created at the bottom Then you can test it in Postman That's it

Directus: a lightweight CMS admin panel — deployment➔
This article covers deployment; the usage guide is in the other one. 1. Directus is a real-time API engine and an intuitive admin panel on top of your database Why it suits you so well: It does not hijack your database: it will not mess with your PostgreSQL table structure; your data stays clean and transparent. APIs are generated automatically: once you create the Blog, Product and Message collections in the admin, they are immediately available at /items/blog or /items/product for your React and Vue apps to fetch. The interface is excellent: the admin UI is written in Vue, looks modern, supports Chinese, and could be used directly as an internal company system. Permissions: there is a complete permission system built in — you can say "the frontend may read blogs and create messages, but may not modify products". Deployment: one-click deployment with Docker, very light and quick to get running. Directus is a standard headless CMS Direct links to the official documentation Official website: https://directus.io/ Documentation: https://docs.directus.io/ API reference: https://docs.directus.io/reference/introduction.html Front-end SDK: https://docs.directus.io/guides/sdk/getting-started.html 2. How to deploy Directus Here I will use the Baota panel as the example Step one: open "Container orchestration" In the top menu of your screenshot, find and click "Container orchestration" Step two: add a project Once you are on the Container orchestration page, click "Add project". In the dialog that appears: Project name: enter directus (lowercase letters only). Source: choose Content. Step three: paste the configuration file Copy the code below and paste it into the configuration input box. version: '3' services: directus: image: directus/directus:latest container_name: directus-server restart: always ports: - 8055:8055 volumes: # Baota creates folders such as uploads in the project directory to hold images - ./uploads:/directus/uploads - ./extensions:/directus/extensions environment: # 1. Base secret (set it yourself, or ask an AI to generate one) KEY: "*****************************" SECRET: "*****************************" # 2. Your online PostgreSQL connection details (you must change this!) DB_CLIENT: "pg" DB_HOST: "your-database-host" DB_PORT: "5432" DB_DATABASE: "your-database-name" DB_USER: "your-database-user" DB_PASSWORD: "your-database-password" # DB_SSL: "true" # If your cloud database requires SSL, remove the # in front # 3. Super admin account (the account you use to sign in to the Directus admin) ADMIN_EMAIL: "admin@yourdomain.com" ADMIN_PASSWORD: "your_password_123" # 4. CORS settings (so your React and Vue apps can make cross-origin requests) CORS_ENABLED: "true" CORS_ORIGIN: "*" Step four: confirm and start When you are done, click "Confirm" at the bottom.Baota will start pulling the official Directus image and launching the container. Depending on the server's network, this takes roughly 1-3 minutes. Step five: open the port (this matters, and beginners forget it) Directus uses port 8055 by default, and you need to make sure it is open to the outside, or the page will not load. Opening it in the Baota panel:Click "Security" in the left menu of the Baota panel, enter 8055 in the port allow list, write "Directus" as the remark, then click allow. Opening it in the Tencent Cloud console (essential):Because your server is on Tencent Cloud, you have to log in to the Tencent Cloud web console -> find this lightweight or cloud server -> find "Firewall" (or security group) -> add a rule -> allow TCP 8055. Why are there two places to open a port? 1. The Tencent Cloud security group opens it to the public internet 2. Baota also controls outside access; it is the "second door". Tencent Cloud is the gate to the compound, Baota is your front door — that is the way to think about it. Step six: open the admin Once everything is ready, type this into your browser: http://your-server-ip:8055 If you see the interface, log in with the ADMIN_EMAIL and the password you set earlier, and you can start creating collections. 3. Logging into Directus You should see this when you get in This is Directus's licence confirmation page. Just click "I'm using Core plan" on the right (free, no key needed). Then save and you are done You will land on your login screen; log in as usual.

Tuning Baota panel performance on a low-spec server➔
This article is aimed at WordPress sites Steps for tuning Baota panel performance 1. Turn on virtual memory "LinuxToolbox" — start with that. · Action: open the Linux toolbox -> find Swap/virtual memory. · Setting: enter 2048 (2GB) or 4096 (4GB), then confirm. · Why: this is the safety net. When you save complex pages repeatedly in the admin and the 4GB of physical memory fills up in an instant, swap keeps the database and PHP from collapsing. 2. Lift MySQL 5.7's memory limit MySQL is where a heavy content site chokes first, so give it enough memory to cache data. · Action: click MySQL 5.7 -> Settings -> Performance tuning. · Setting: ○ find Optimisation scheme and pick the 2-4GB preset from the dropdown. ○ check the innodb_buffer_pool_size parameter in particular; it should have been raised automatically to 512M or 1024M (if not, set it to 512M by hand). · Why: so that the vast majority of product queries run in memory instead of crawling to disk. 3. PHP tuning PHP compiles front-end requests on the fly · Step one (install extensions): click PHP 8.2 -> Settings -> Install extensions. Be sure to install opcache and redis (don't skip redis, or the Redis software you installed does nothing). · Step two (tune concurrency): click Performance tuning. ○ Run mode: Dynamic ○ max_children: 40 (the top safety level for the whole server, so that even five sites being busy at once can't drain the 4GB) ○ start_servers: 5 ○ min_spare_servers: 5 ○ max_spare_servers: 10 · Step three (more memory): click Config modification. Change memory_limit from the default 128M to 256M. 4. Tuning Nginx configuration (optional, but strongly recommended) · Action: click Nginx 1.26.3 -> Settings -> Performance tuning. · Setting: check worker_processes; it can usually be set to 2 (matching your 2 CPU cores), or left on auto. Also make sure Gzip compression is enabled (level 4 or so is enough; higher just eats CPU). 5. Settings inside each site Once the server-level tuning is done, there are two things you must do inside every WordPress site to close the loop: 1. Connect Redis as an in-memory database: once Redis is installed, add the Redis Object Cache plugin on each site and turn it on with one click. That sends a huge number of repeated queries to memory and takes a lot of load off MySQL. 2. Set up full-page static caching: install WP Rocket (or another strong caching plugin) on every site, so that 100% of overseas visitors browsing products never reach PHP or the database. 6. The Redis identifiers a multi-site setup needs The server hosts 3-5 sites and every one of them has Redis Object Cache enabled, so you must edit wp-config.php and give each site its own Redis database ID or prefix. · What happens if you don't: by default every site writes its cache into Redis database 0. The result is that site A's frontend may, for no apparent reason, show products from site B — the whole database descends into chaos. · The fix: add these two lines to the wp-config.php of every site (each site's number must be unique): Site A: · PHP Plain Text define( 'WP_REDIS_DATABASE', 0 ); define( 'WP_CACHE_KEY_SALT', 'siteA_' ); · Site B: · PHP Plain Text define( 'WP_REDIS_DATABASE', 1 ); define( 'WP_CACHE_KEY_SALT', 'siteB_' ); · and so on. That way Redis keeps every site's data strictly separate, queries stay fast, and they don't interfere with each other. The existing wp-config.php may already contain an auto-generated one Just comment it out and put your own in 7. Tight control of Heartbeat in WP Rocket 1. Behavior in backend (WordPress admin) · What happens if you turn it off? your WordPress dashboard stops updating in real time. WooCommerce's live sales figures and plugin notifications stop refreshing automatically; you have to press F5 before they change. · Effect on the server: if you leave the admin open in the background, disabling this saves a lot of pointless CPU. · Recommendation: chooseDisable completely (disabled entirely). Nobody sits watching live numbers on a dashboard all day, so disable it and keep the concurrency for something useful. 2. Behavior in post editor (post/page editor) · What happens if you turn it off? this one has fatal consequences. Heartbeat's core job here is "autosave" and "post locking (so two admins don't overwrite each other)". If you disable it completely and your browser crashes or the network drops while you are laying out a complicated page, hours of work are gone, because nothing was saved automatically. · Effect on the server: the frequent autosaves while editing really do eat CPU. · Recommendation: keepReduce activity (reduced activity), which is what your screenshot shows. WP Rocket stretches autosave from every 15 seconds to every 2 minutes. Your work is protected and the pressure on PHP drops sharply. 3. Behavior in frontend (the public site - what visitors see) · What happens if you turn it off? if your frontend runs a live chat plugin, or a WooCommerce mini cart that depends heavily on AJAX to refresh in real time, disabling it completely can break those features. · Effect on the server: with a few hundred visitors, each sending one heartbeat request a minute, your 2 cores and 4GB are overwhelmed in an instant (502 errors appear). · Recommendation: chooseDisable completely (disabled entirely). Since your frontend already has WP Rocket's static cache, visitors have no reason to keep a meaningless "heartbeat" connection to the server. (Note: if disabling it makes WooCommerce adding to the cart stutter, put it back toReduce activity as shown in your screenshot). 8. Mail timeouts and the PHP-FPM avalanche To stop servers being used to send spam, cloud providers block 25 hard by default. When a site triggers an email, WordPress's underlying PHPMailer obliviously tries to reach port 25. Since the port is blocked, the request never goes out and it just sits there waiting to time out. With 40 concurrent PHP processes, if 40 people trigger an email action at the same moment, all 40 processes hang in a waiting state at once, CPU spikes to 100%, and the whole site locks up with 502 Bad Gateway. 1. Turn it off inside PHP Cut the mail function out of PHP's configuration so PHP loses the ability to send email at all. 1. open the Baota panel, find App store on the left -> click PHP-8.2 and then Settings. 2. find [Disabled functions] in the left menu. 3. type mail into the box and click Add. 4. click [Services] on the left and restart PHP. · Effect: anything that tries to call PHP's underlying mail system is blocked instantly with an error, so you never get a "waiting for timeout" that pins the CPU. 2. Intercept it in WordPress's business layer Disabling the PHP function alone is not always enough: WordPress sometimes still walks through its slow code path before erroring out. As a developer, the cleanest approach is to block it the moment WordPress opens its mouth to send mail. You can add the line below to functions.php in your current theme (or add it through the Code Snippets plugin): Plain Text // Block WordPress from sending any email at all; takes 0 milliseconds add_filter( 'pre_wp_mail', '__return_false' ); · Effect: this is a pre-hook provided by WordPress itself. When any plugin (WooCommerce included) tries to send mail, it arrives here, returns false and the flow ends. Note: if email is disabled completely, clicking"forgot password" on the login screen will not send a reset link and the account is effectively a dead file, so you need some way to send mail. (See theSMTP guide for details.)

Elementor and WP-Cron can spike your server load➔
Background A server with 2 cores and 4GB of RAM hosts a WordPress corporate site, alongside the Baota panel, PHP-FPM, MySQL and Redis. Monitoring showed the load hitting 100 percent, yet CPU usage was not high and memory was not exhausted. System load showed: 1-minute load:8.82 5-minute load:11.54 15-minute load:5.58 But the CPU looked like: idle:97% iowait:0.2% So the source of the load needed further investigation. Question one: the load is at 100%, so why isn't the CPU saturated? Why Linux's load average is not the same thing as CPU usage. Server load includes: tasks currently using the CPU tasks waiting for the CPU tasks waiting on disk or other resources So you can have: very low CPU usage normal memory and a very high load average This situation is usually related to: blocked PHP requests database queries waiting disk I/O a large number of concurrent tasks Question two: how do you confirm whether WordPress is the cause? Method Look at the access log: tail -5000 /www/wwwlogs/web-chang.com.log Count the endpoints being hit: awk '{print $7}' log file | sort | uniq -c | sort -nr The investigation found a lot of requests concentrated on: /wp-admin/admin-ajax.php /wp-json/elementor/v1/checklist/user-progress /wp-json/elementor/v1/global-classes /wp-json/rankmath/v1/updateMeta /wp-cron.php admin-ajax.php?action=as_async_request_queue_runner which means the main pressure comes from WordPress admin endpoints and plugin tasks. Question three: which components are generating all these requests? Analysing the cause Main sources: 1. Elementor The Elementor page editor keeps calling: REST API page state sync global style sync check tasks For example: /wp-json/elementor/v1/checklist/user-progress 2. WP-Cron WordPress triggers scheduled tasks on visits by default. When someone visits: /wp-cron.php?doing_wp_cron it runs: plugin tasks data synchronisation cleanup tasks queue tasks As traffic grows, that creates extra PHP requests. 3. Action Scheduler When the log shows: admin-ajax.php?action=as_async_request_queue_runner it means WordPress's async task queue is running. Common sources: Elementor WooCommerce Rank Math form plugins Question four: how do you reduce WordPress's server load? Solution one: turn off WP-Cron's automatic trigger Edit: wp-config.php Add: define('DISABLE_WP_CRON', true); Then run it from a server cron job: wget -q -O - https://example.com/wp-cron.php?doing_wp_cron >/dev/null 2>&1 set it to run every ten minutes. That stops visitor traffic from triggering background tasks. Solution two: limit PHP-FPM concurrency A 2-core, 4GB server should not run too many PHP processes. Recommendation: pm.max_children = 8 pm.start_servers = 2 pm.min_spare_servers = 1 pm.max_spare_servers = 3 pm.max_requests = 500 avoid many PHP child processes holding memory at the same time. Solution three: enable PHP OPcache Enable: opcache.enable=1 opcache.memory_consumption=128 opcache.max_accelerated_files=10000 to cut the cost of recompiling PHP. Solution four: check Action Scheduler jobs Query the database: SELECT status, COUNT(*) FROM wp_actionscheduler_actions GROUP BY status; If a large number of jobs are in: pending failed you need to clean them up or look at the plugin responsible. Question five: why is a 2-core, 4GB server so prone to this? Why A WordPress environment usually includes: Nginx PHP-FPM MySQL Redis the Baota panel several plugins On 2 cores and 4GB, the resources actually left for WordPress are limited. When these happen at the same time: someone editing a page in Elementor WP-Cron running its tasks a plugin syncing in the background database queries piling up more PHP requests lead to: more PHP-FPM processes more memory pressure swap being used and system load climbing Summary The main causes of this load spike: WordPress's Elementor admin requests are numerous. WP-Cron keeps triggering tasks. Action Scheduler runs its async queue. PHP-FPM concurrency was never tuned for a low-spec server. What to optimise in the end: disable WP-Cron's default trigger. run cron from a scheduled job. cap the number of PHP-FPM processes. enable OPcache. inspect the background jobs plugins create. On a 2-core, 4GB server running a WordPress corporate site, the point is not to add more PHP processes but to control how many background tasks and plugin requests are running.

USBCAN versus SocketCAN: a comparison and a migration in practice➔
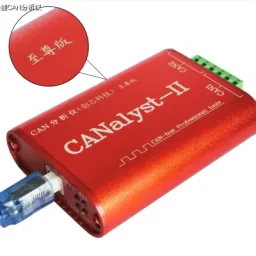
1. The difference USBCAN (the virtual serial approach): the device appears to an Android app as a standard USB CDC device, and CAN frames go out and come in by reading and writing serial strings (SLCAN, for example). Advantages: no need to modify the Android image or the Linux kernel; plug and play; a cross-platform front-end framework such as React Native can integrate the hardware quickly through a mature USB serial library. SocketCAN (the kernel network approach): the CAN bus is integrated into the Linux kernel network stack, and the hardware appears at the system level as a standard network device such as can0. Advantages: concurrent reads and writes from multiple processes; kernel-level scheduling, so communication latency is extremely low; no physical dependence on a single USB node, with stability at automotive-grade industrial standards. 2. Where USBCAN runs out of road The original goal of the project was to prove quickly, on an unmodified stock Android development board, that voice could control body hardware offline. That is why I went with USBCAN. But as the architecture evolved, the system needed a background daemon to drive the UI from low-level signals (for example: silently watch reversing CAN messages in the background and bring up the surround-view interface the moment a signal arrives), and a lot of problems showed up. Hardware exclusivity and multi-process conflict: Android's USB port can only be held by one process at a time. If the background service is holding the USB-CAN module to watch for reversing signals, the foreground voice-control app cannot send commands. SocketCAN works over network sockets, so any number of processes can subscribe and send CAN frames at once. Race conditions in physical node enumeration: in a real environment, hot-plugging other USB devices (a mouse, a flash drive) reshuffles the underlying USB enumeration (VID/PID), so the app frequently misidentifies devices or crashes. SocketCAN's can0 node is declared and bound statically by the kernel, which makes it immune to USB peripherals being plugged and unplugged. It fits Android's native architecture: to get zero-latency layer switching in the UI, the front end had to move from React Native to Kotlin and Jetpack Compose. Alongside native Android development, SocketCAN makes better use of system-level service keep-alive and hardware co-processing, which makes it the natural choice on the way to a standardised automotive head-unit architecture. All three of these are critical technical problems, and none of them can be avoided.
Building a cheap private Fabric Minecraft server from scratch➔
Introduction This article records the problems I ran into setting up a Minecraft Fabric server on Debian: server environment setup, Fabric mod compatibility, client connections, performance tuning and crash investigation. The goal was not a large commercial multiplayer server, but a small survival environment for 3-5 people that also keeps: lightweight Fabric mod support low server cost stable operation support for client-side optimisation mods as little setup work for friends as possible Along the way I hit Fabric Loader version conflicts, Java version problems, client mod synchronisation, chunk loading speed and Watchdog crashes. 1. The server's basic environment 1.1 Hardware The final server configuration: Item Value CPU 2 cores Memory 8GB System Debian 12 Bookworm Java Temurin JDK 21 Minecraft version 1.20.1 Server Fabric Server Network 6 Mbps bandwidth Players 3-5 The server started as: 2 cores, 4GB RAM Java 17 Fabric 1.20.1 I later upgraded to 8GB of memory mainly for: more room for mods less memory pressure while chunks generate better stability with several players online at once 2. System environment 2.1 Why Debian 12 I chose Debian 12 for the server rather than Ubuntu. Main reasons: lower system resource usage fewer background services better stability better suited to a server that runs for a long time Base environment: Debian 12 (for stability) Java 21 screen Fabric Server Do not forget to open the ports 3. Installing the Fabric server 3.1 The initial Fabric Loader problem The first server start gave: Incompatible mods found! Error: Fabric API 0.92.8+1.20.1 requires Fabric Loader >=0.16.10 ModernFix requires Fabric Loader >=0.16.10 Cause: The server was using: fabric-loader-0.15.11 but the optimisation mod I installed required: Fabric Loader >=0.16.10 Fix: Download the Fabric server again: wget -O fabric-server.jar \ "https://meta.fabricmc.net/v2/versions/loader/1.20.1/0.16.10/1.0.1/server/jar" Upgrade Fabric Loader to: 0.16.10 4. Java version compatibility 4.1 Java 17 caused a failed start After upgrading Fabric I got: UnsupportedClassVersionError class file version 65.0 What the error means: class version 65 = Java 21 class version 61 = Java 17 Explanation: Some components were already compiled for Java 21, but the server was still running Java 17. 4.2 Installing Java 21 The Debian repositories do not have: apt install openjdk-21-jdk so I used Temurin JDK: Install directory: /opt/java/jdk-21.0.11+10 Configuration: update-alternatives \ --install /usr/bin/java java \ /opt/java/jdk-21.0.11+10/bin/java 2100 Verification: java -version The server's final runtime environment: Java 21 5. Tuning the server start parameters Final launch: java \ -Xms2800M \ -Xmx2800M \ -XX:+UseZGC \ -XX:+ZGenerational \ -XX:+AlwaysPreTouch \ -XX:+DisableExplicitGC \ -XX:+PerfDisableSharedMem \ -jar fabric-server.jar nogui What the parameters do: ZGC to reduce GC pauses: -XX:+UseZGC Good for: many mods long uptimes large maps a fixed heap -Xms2800M -Xmx2800M avoiding the stutter that comes from resizing the heap at runtime. 6. Mods currently installed on the server Server-side mods The main ones right now: Mod Purpose Fabric API Fabric base API Lithium game logic optimisation ModernFix memory and startup optimisation FerriteCore lower memory usage Krypton network optimisation Right Click Harvest right-click harvesting EasyAuth login authentication 7. Client-side mods On the client I additionally installed: performance Mod Purpose Sodium large FPS gains Iris shader support Indium Sodium compatibility Entity Culling fewer invisible entities rendered Dynamic Lights dynamic lights extended view distance I also tried: Distant Horizons for: LOD distant rendering seeing terrain far beyond the normal view distance But I found that: when the server has not pre-generated the map: distant areas show as blank cliffs appear the minimap goes black in places Cause: Distant Horizons can only render data the client already has. It cannot invent chunks the server never sent. 8. Analysing chunk loading 8.1 Why you see cliffs Minecraft's chunk loading flow: Player moves ↓ Client requests a chunk ↓ Server generates or loads the chunk ↓ Sent to the client ↓ Client renders it So: in areas nobody has explored: the server has no chunk data. Distant Horizons cannot show real terrain. 8.2 Is 6 Mbps enough? For 3-5 players: 6 Mbps is basically enough. Slow chunk loading is mainly not a bandwidth problem; it is: the CPU generating chunks disk reads Minecraft's single-threaded limit 9. Investigating server crashes 9.1 The Watchdog problem The server had been crashing. The main reason: Minecraft's Watchdog detected: Main thread unresponsive for too long triggering: Server force-closed Common causes: lots of new chunks being generated players exploring quickly mods occupying the main thread GC pauses 10. Server performance testing Using: /spark tps to run the test. Final results: TPS: 20.0 20.0 20.0 20.0 20.0 Notes: the server holds full TPS. Tick: 5.6 / 6.8 / 10.7 / 20.7 ms Minecraft's standard is: 50ms = the limit the current peak: 20.7ms which is within the normal range. CPU: system 7% process 6% That means: CPU pressure is very low. 11. Current state of the server Environment: Minecraft 1.20.1 Fabric Loader 0.16.10 Java 21 2 cores, 8GB Fabric optimisation mods Sodium client optimisation Iris shaders Distant Horizons LOD Performance: TPS: 20 MSPT: <30ms CPU: low usage Memory: plenty Current bottleneck: not the server's performance. The main issues: the world has not been pre-generated Distant Horizons does not have enough LOD data Minecraft's default chunk generation is the limit 12. What to optimise next 12.1 Pre-generate the map with Chunky Recommended: Chunky Pre-generate: For example: Spawn radius: 512 chunks Workflow: Nobody online ↓ Server generates the map ↓ Region files are saved ↓ Players join and read them directly noticeably improves: stutter while exploring broken terrain Distant Horizons rendering 12.2 Adding gameplay mods Since the client pack has already gone out, I do not recommend adding many mods that the client must install. Prefer: things that run server-side: economy quests admin tools world optimisation to keep maintenance cheap for my friends. Summary Setting up this Fabric Minecraft server mainly solved a few core problems: matching Fabric Loader against mod versions Java 17 versus Java 21 compatibility syncing client and server mods investigating Watchdog crashes chunk loading and distant rendering performance testing and tuning In the end the server reached a stable running state. For a survival server of 3-5 players the current setup is enough; the next round of work should shift from “more hardware” to: pre-generating the map mod selection world management tuning for long-term stability The main limit on a small Fabric server like this is usually not memory, but Minecraft's main-thread capacity and the pressure of world generation.

WordPress: adding a sidebar media panel➔
It is actually very simple — just make a global floating block The code is at the bottom Change the content on lines 105-110 to the client's contact details On line 219, change the icon shape: 50% for a circle, 0% for a square, 8%-16% for rounded corners <!-- Import the icon font library --> <link rel="stylesheet" href="https://at.alicdn.com/t/c/font_4210690_bfpz45tuycu.css"> <!-- Sidebar: contact details and quick actions --> <aside class="contact-sidebar"> <!-- Sidebar hide/show toggle button --> <div class="contact-sidebar-hide icon-box" onclick="toggleSidebar()"> <i id="hidetoright" class="icon iconfont icon-arrowrighttoright"></i> </div> <!-- Phone contact entry (WhatsApp) --> <div class="contact-sidebar-phone icon-box"> <a class="a-open" href="" target="_blank" rel="noopener" id="whatsappLink"> <i class="icon iconfont icon-whatsapp"></i> </a> <div class="phone"> <span class="show-phone" id="phoneDisplay"></span> </div> </div> <!-- Email contact entry --> <div class="contact-sidebar-email icon-box"> <a class="a-open" href="" id="emailLink"> <i class="icon iconfont icon-mail"></i> </a> <div class="email"> <span class="show-email" id="emailDisplay"></span> </div> </div> <!-- QR code display (not enabled yet) <div class="contact-sidebar-code icon-box"> <a class="a-open" href="#" target="_blank" rel="noopener"> <i class="icon iconfont icon-weixin"></i> </a> <div class="code"> <img class="show-code" src="../../images/code.png" alt="WeChat QR code"> </div> </div> --> <!-- Back-to-top button (not enabled yet) <div class="contact-sidebar-totop icon-box" onclick="toTop()"> <i class="icon fa fa-light fa-arrow-up fa-lg"></i> </div> --> </aside> <!-- Bottom bar: contact details on mobile --> <footer class="footerbar" id="footerbar"> <!-- Bottom bar hide/show toggle button --> <div class="foot-hide foot-box" onclick="toggleFooter()"> <i id="hidetoleft" class="icon iconfont icon-arrowlefttoleft"></i> </div> <!-- Bottom bar phone entry --> <div class="foot-phone foot-box"> <a class="a-open" href="" target="_blank" rel="noopener" id="footerWhatsappLink"> <i class="icon iconfont icon-whatsapp"></i> </a> <div class="show-footer_phone"> <span class="show-phone" id="footerPhoneDisplay"></span> </div> </div> <!-- Bottom bar email entry --> <div class="foot-email foot-box"> <a class="a-open" href="" target="_blank" rel="noopener" id="footerEmailLink"> <i class="icon iconfont icon-mail"></i> </a> <div class="show-footer_email"> <span class="show-email" id="footerEmailDisplay"></span> </div> </div> <!-- Bottom bar QR code (not enabled yet) <div class="foot-code foot-box"> <i class="icon iconfont icon-erweima"></i> <div class="show-footer_code"> <img src="../../images/code.png" alt="Support QR code"> </div> </div> --> <!-- Bottom bar back-to-top (not enabled yet) <div class="foot-totop foot-box" onclick="toTop()"> <i class="icon-foot fa fa-light fa-arrow-up fa-lg "></i> </div> --> </footer> <script> // Configuration - change the contact details here and every usage updates automatically const contactConfig = { phone: '8613800000000', // Phone number (used for the link) phoneDisplay: '+86 15862618383', // The phone number shown email: 'hello@example.com' // Email address }; // Initialise the contact details function initContactInfo() { // Update the sidebar contact details document.getElementById('whatsappLink').href = `https://api.whatsapp.com/send?phone=${contactConfig.phone}`; document.getElementById('phoneDisplay').textContent = contactConfig.phoneDisplay; document.getElementById('emailLink').href = `mailto:${contactConfig.email}`; document.getElementById('emailDisplay').textContent = contactConfig.email; // Update the bottom bar contact details document.getElementById('footerWhatsappLink').href = `https://api.whatsapp.com/send?phone=${contactConfig.phone}`; document.getElementById('footerPhoneDisplay').textContent = contactConfig.phoneDisplay; document.getElementById('footerEmailLink').href = `mailto:${contactConfig.email}`; document.getElementById('footerEmailDisplay').textContent = contactConfig.email; } // Initialise the contact details after the page loads window.addEventListener('DOMContentLoaded', initContactInfo); // Sidebar toggle counter (controls the icon rotation) let sidebarToggleCount = 0; // Bottom bar toggle counter let footerToggleCount = 0; /** * Toggle the sidebar's show/hide state * 1. Rotate the toggle button * 2. Slide the contact details in and out */ function toggleSidebar() { // Get the DOM elements const toggleIcon = document.getElementById('hidetoright'); const whatsappItem = document.querySelector('.contact-sidebar-phone'); const emailItem = document.querySelector('.contact-sidebar-email'); const codeItem = document.querySelector('.contact-sidebar-code'); // Update the rotation (180 degrees per click) sidebarToggleCount += 180; toggleIcon.style.transform = `translate(-50%, -50%) rotate(${sidebarToggleCount}deg)`; // Toggle the show/hide state const isHidden = whatsappItem.style.transform === 'translateX(100px)'; if (isHidden) { // Show the element whatsappItem.style.transform = 'translateX(0)'; emailItem.style.transform = 'translateX(0)'; if (codeItem) codeItem.style.transform = 'translateX(0)'; } else { // Hide the element whatsappItem.style.transform = 'translateX(100px)'; emailItem.style.transform = 'translateX(100px)'; if (codeItem) codeItem.style.transform = 'translateX(100px)'; } } /** * Toggle the bottom bar's show/hide state * 1. Rotate the toggle button * 2. Slide the contact details in and out */ function toggleFooter() { // Get the DOM elements const toggleIcon = document.getElementById('hidetoleft'); const whatsappItem = document.querySelector('.foot-phone'); const emailItem = document.querySelector('.foot-email'); const codeItem = document.querySelector('.foot-code'); // Update the rotation (180 degrees per click) footerToggleCount += 180; toggleIcon.style.transform = `translate(-50%, -50%) rotate(${footerToggleCount}deg)`; // Toggle the show/hide state const isHidden = whatsappItem.style.transform === 'translateX(-1000px)'; if (isHidden) { // Show the element whatsappItem.style.transform = 'translateX(0)'; emailItem.style.transform = 'translateX(0)'; if (codeItem) codeItem.style.transform = 'translateX(0)'; } else { // Hide the element whatsappItem.style.transform = 'translateX(-1000px)'; emailItem.style.transform = 'translateX(-1000px)'; if (codeItem) codeItem.style.transform = 'translateX(-1000px)'; } } /** * Scroll back to the top * Handles the different ways browsers report scroll height */ function toTop() { // Modern browsers if (window.scrollTo) { window.scrollTo(0, 0); } else { // Older browsers document.body.scrollTop = 0; document.documentElement.scrollTop = 0; } } </script> <style> /* Base styles for the icon container */ .icon-box { width: 50px; height: 50px; /* Circle border colour (currently commented out) */ /* border: 2px solid #c9c9c9; */ border-radius: 50%; position: relative; /* Background colour inside the circle */ background-color: rgba(255, 255, 255, 0.25); margin-bottom: 5px; } /* Shared icon styles */ .icon { /* Sidebar icon colour */ color: #fff; position: absolute; top: 50%; left: 50%; transform: translate(-50%, -50%); transform-origin: 50% 50%; } /* Adjustments for specific icons */ .icon-arrowrighttoright { font-size: 30px !important; } .icon-mail { font-size: 20px !important; top: 47%; /* Fine-tune the mail icon's vertical position */ } .icon-whatsapp { font-size: 20px !important; } .icon-weixin { font-size: 30px; } /* Colour definitions for sidebar elements */ .contact-sidebar-hide { /* Background colour of the hide button */ background-color: #1C5E9A; } .contact-sidebar-phone { /* Phone icon background colour */ background-color: #1C5E9A; } .contact-sidebar-email { /* Email icon background colour */ background-color: #1C5E9A; } .contact-sidebar-code { /* QR code icon background colour */ background-color: #1C5E9A; } /* Bottom bar element styles */ .foot-hide { /* Bottom hide button background colour */ background-color: #1C5E9A; width: 60px !important; height: 50px; /* Explicit height so the icon is not clipped */ z-index: 9999; /* Make sure it renders above other elements */ } .foot-phone, .foot-email, .foot-code { background-color: #1C5E9A; transition: all 1s ease; /* Smooth transition */ } /* Bottom bar container styles */ .foot-box { /* Bottom border colour (currently commented out) */ /* border: 2px solid #fff; */ margin: 0px -1px 0px 0px; width: 50%; cursor: pointer; /* Show a pointer on hover */ position: relative; } /* Border adjustments for bottom bar elements */ .foot-box:nth-child(2), .foot-box:nth-child(3), .foot-box:nth-child(4) { border-left: 0px; } /* Overall bottom bar styles */ .footerbar { z-index: 9999; /* Make sure it sits above the page content */ position: fixed; left: 0; bottom: 0; width: 100%; height: 50px; text-align: center; display: flex; justify-content: space-around; transition: all 0.3s linear; /* Smooth transition effect */ } /* Bottom bar icon styles */ .icon-foot { /* Bottom icon colour */ color: rgb(86, 86, 243); position: absolute; left: 50%; top: 50%; transform: translate(-50%, -50%); } /* Pop-up message styles */ .code > .show-code, .email > .show-email, .phone > .show-phone { /* Sidebar pop-up text size */ font-size: 18px; white-space: nowrap; /* Prevent text wrapping */ padding: 0px 20px; } /* Overall sidebar styles */ .contact-sidebar { position: fixed; z-index: 9999; /* Make sure it sits above the page content */ right: 0; bottom: 15%; padding: 6px 6px 0; border-radius: 20px 0 0 20px; /* Rounded corner on the right */ } /* Animation for sidebar elements */ .contact-sidebar-phone { transition: all 1.2s; /* Transition time for the phone icon */ } .contact-sidebar-email { transition: all 0.9s; /* Transition time for the email icon */ } .contact-sidebar-code { transition: all 0.6s; /* Transition time for the QR code icon */ } .icon-arrowlefttoleft { font-size: 30px !important; /* Make the bottom arrow bigger so it matches the sidebar arrow */ } .icon-arrowlefttoleft, .icon-arrowrighttoright { transition: all 0.3s; /* Transition time for the arrow icon */ } /* Styles for elements inside the sidebar */ .contact-sidebar > div { cursor: pointer; /* Show a pointer on hover */ text-align: center; } .contact-sidebar > div h3 { font-size: 15px; font-weight: 500; color: #fff; } /* Sidebar pop-up styles */ .contact-sidebar > div .code, .contact-sidebar > div .email, .contact-sidebar > div .phone, .contact-sidebar > div .hide { padding: 6px; align-items: center; display: none; /* Hidden by default */ position: absolute; z-index: 9999; /* Make sure it renders above the icon */ top: 15%; right: 70px; /* Show it to the left of the icon */ border-radius: 8px; box-shadow: 8px 8px 8px 8px rgba(88, 95, 110, 0.22); /* Drop shadow */ background-color: #f7f7f7; } /* Bottom bar pop-up styles */ .footerbar > div .show-footer_code, .footerbar > div .show-footer_email, .footerbar > div .show-footer_phone { padding: 6px; align-items: center; display: none; /* Hidden by default */ position: absolute; z-index: 9999; /* Make sure it renders above the icon */ bottom: 110%; /* Show it above the icon */ font-size: 10px; border-radius: 8px; box-shadow: 8px 8px 8px 8px rgba(88, 95, 110, 0.22); /* Drop shadow */ background-color: #f7f7f7; } /* Arrow styles for the sidebar pop-up */ .contact-sidebar > div .email:after, .contact-sidebar > div .phone:after, .contact-sidebar > div .code:after { position: absolute; top: 50%; left: 100%; /* Show the arrow on the right */ content: ''; transform: translateY(-50%); border-width: 5px; border-style: solid; border-color: transparent transparent transparent #ffffff; /* Triangle arrow */ } /* Show the pop-up on hover */ .contact-sidebar-email:hover .email, .contact-sidebar-phone:hover .phone, .contact-sidebar-code:hover .code, .foot-email:hover .show-footer_email, .foot-phone:hover .show-footer_phone, .foot-code:hover .show-footer_code { display: block; } /* QR code image styles */ .show-footer_code > img, .code > img { width: 80px !important; } /* Phone pop-up width */ .phone { width: 200px; } /* Link styles */ .a-lg { width: 100px; height: 100px; } .a-open { display: block; height: 50px; border-radius: 50px; } /* Responsive visibility */ @media (min-width: 770px) { /* Hide the bottom bar on large screens */ .footerbar { display: none; } } @media (max-width: 770px) { /* Hide the sidebar on small screens */ .contact-sidebar { display: none; } } </style>